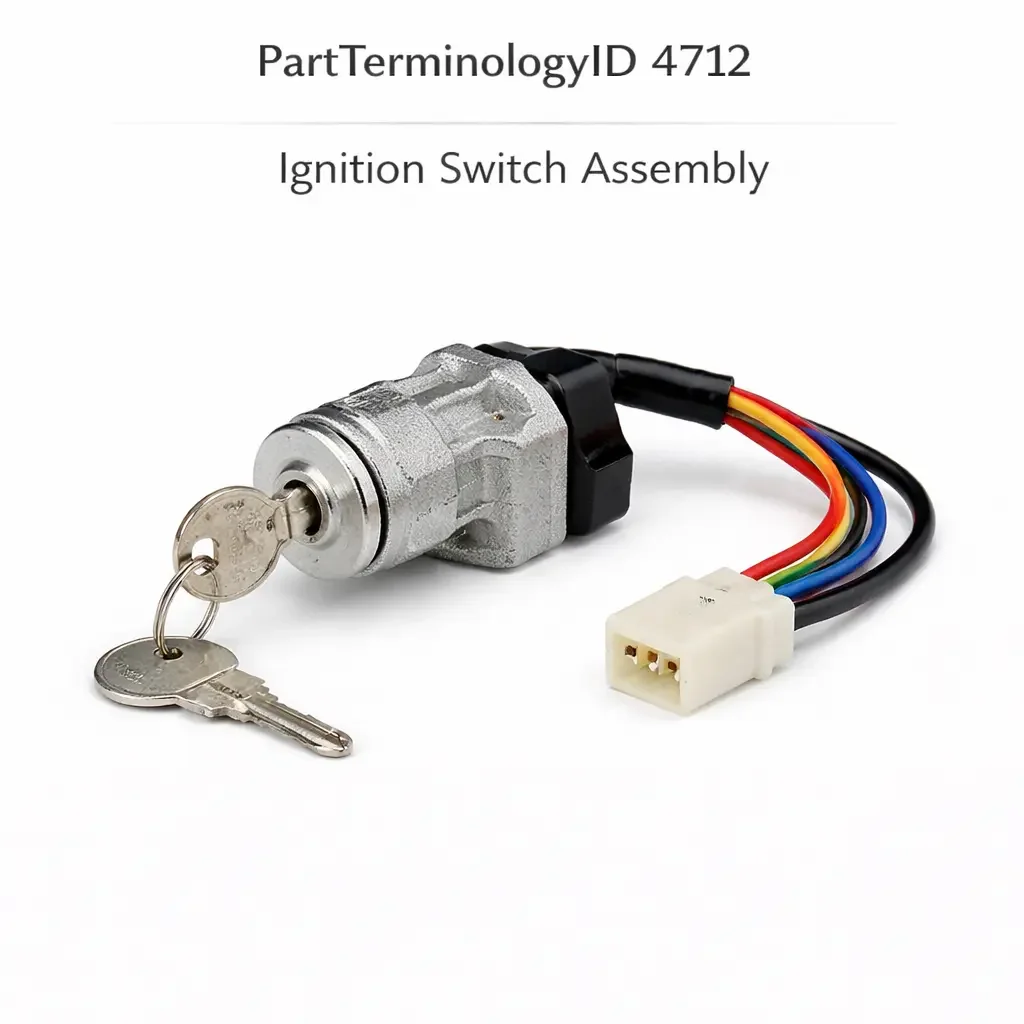
Ignition Switch Assembly (PartTerminologyID 4712): Contact Module Configuration, Transponder Integration, and Steering Column Lock Compatibility
Written by Arthur Simitian | PartsAdvisory
Introduction
The ignition switch assembly is one of the most functionally complex components in the vehicle's electrical system. It is the primary interface between the driver and the vehicle's power distribution architecture, controlling which electrical circuits are energized at each of its defined positions and initiating the engine starting sequence. On a conventional keyed vehicle, every electrical system in the vehicle depends on the ignition switch assembly for its operating power at some point in the drive cycle. When the assembly fails, the consequences can range from a single circuit that stops working to a complete no-start condition, depending on which portion of the assembly has failed and what position it has failed in.
The ignition switch assembly also sits at the intersection of the mechanical anti-theft system and the electrical powertrain control system. The lock cylinder prevents unauthorized key access. The transponder reader coil verifies that the key contains the correct immobilizer transponder before the PCM is permitted to enable fuel and ignition. The electrical contact module distributes power to the vehicle's circuits in the correct sequence as the key is rotated through its positions. All three of these functions must work correctly for the vehicle to start and operate as designed.
What drives the return rate on PartTerminologyID 4712 is the degree to which the ignition switch assembly varies in design across vehicle generations, trim levels, and production periods. A switch assembly that covers the same vehicle application as the one being replaced can still fail to restore correct function if it has a different contact module configuration, a different transponder coil type, or a different lock cylinder profile. Understanding which attributes determine compatibility, and which ones catalog listings most commonly omit, is the difference between a straightforward replacement and a return that requires a second order and a follow-up service visit.
The ignition switch assembly is also one of the few components in the aftermarket where an incorrectly specified replacement does not simply fail to work, it can produce a series of misleading symptoms that direct the diagnosis away from the switch itself. A replacement assembly without the correct transponder coil produces a crank-no-start with a security warning, which leads many technicians and owners to investigate the immobilizer module, the ECM, or the keys before identifying the switch as the source. A replacement contact module with a different Run 1 and Run 2 configuration may power most vehicle systems correctly while leaving one or two specific circuits unpowered, generating a diagnostic chase that does not resolve until the contact configuration is compared against the OE specification. These misdirected diagnostics represent real costs in labor and parts, all of which trace back to a catalog listing that omitted a critical attribute.
This guide covers the complete picture for PartTerminologyID 4712: the assembly's function across all positions, how the components within it interact, how it fails, how to diagnose it accurately, and what attributes must be present in every catalog listing to prevent returns.
What the Ignition Switch Assembly Does
Position-by-Position Circuit Control
The ignition switch assembly controls vehicle electrical circuits through a defined sequence of positions. The number and labeling of positions varies slightly by vehicle and market, but the standard sequence on passenger car applications is Lock, Accessory, On (also called Run or Ignition), and Start. Commercial vehicles may add a second accessory position or a separate preheat position for diesel applications.
Lock position: The key can be inserted and removed. The steering column lock is engaged on vehicles with a column lock mechanism. No vehicle electrical circuits are powered through the ignition switch except in some designs where a retained accessory power feature keeps selected circuits active for a brief period after the key is removed.
Accessory position: Selected low-current accessory circuits are powered, typically the radio, interior lighting controls, and in some designs the power window and sunroof circuits. The engine management system, fuel system, and primary vehicle systems are not powered. This position allows the driver to use entertainment and comfort features without the ignition on.
On position: All engine management, fuel system, and primary vehicle circuits are powered. The instrument cluster illuminates, warning lamps perform a self-check, and the ECM, TCM, ABS module, and other control modules power up and initialize. The vehicle is ready for engine starting. This is the position the key returns to when released from the Start position.
Start position: The starter circuit is completed in addition to the full On-position power distribution. The ignition switch start contact connects the battery or ignition voltage to the starter relay or directly to the solenoid S terminal. The key is spring-loaded to return from Start to On when released. On some applications, the start position also activates a ballast resistor bypass to supply full voltage to the ignition coil during cranking.
Transponder Reader Function
On vehicles with a transponder-based immobilizer system, the ignition switch assembly includes a transponder reader coil that is positioned around the lock cylinder barrel. When the key is inserted and rotated, the coil reads the transponder chip embedded in the key head. The coil is connected to the immobilizer module or the ECM, which checks the transponder code against its stored authorization list. If the code is valid, the immobilizer permits the ECM to enable fuel injection and ignition. If it is absent or invalid, the immobilizer prevents starting regardless of whether the ignition switch contacts are in perfect condition.
The transponder reader coil is a passive inductive element that draws its operating energy from the immobilizer module. It does not require a separate power supply. However, it must be physically positioned correctly around the lock cylinder for reliable transponder reading, and it must be electrically compatible with the immobilizer module in terms of operating frequency and signal format. A reader coil designed for a different frequency or a different signal protocol will not communicate with the vehicle's immobilizer module, producing a no-start condition with an engine security warning regardless of key validity.
Steering Column Lock Integration
On vehicles with a steering column lock, the ignition switch assembly includes a mechanical interface between the lock cylinder and the column lock actuator. When the key is removed from the Lock position, the lock actuator extends a bolt into a notch in the steering column shaft, preventing the steering wheel from being rotated. When the key is inserted and rotated out of the Lock position, the bolt retracts and the steering column is free.
The column lock mechanism varies across platforms. On older designs it is a simple mechanical bolt driven by a cam on the lock cylinder. On newer designs it may be an electronically controlled actuator that is commanded by the BCM based on the key position and the vehicle's security status. On push-button start systems without a physical key, the column lock is entirely electronic and is engaged and released by the BCM based on door status, vehicle speed, and security system state.
A replacement ignition switch assembly that does not include the correct column lock interface will either not engage the lock mechanism correctly or will prevent the lock from releasing, which can leave the driver unable to steer the vehicle if the assembly is installed incorrectly.
Design Variations
Two-Piece Assemblies: Lock Cylinder and Contact Module
Most ignition switch assemblies for passenger vehicles consist of two separable components: the mechanical lock cylinder, which includes the key way and the tumbler mechanism, and the electrical contact module, which contains the contact sets for each ignition position. The lock cylinder attaches to the steering column housing through a retention mechanism, and the contact module attaches to the back of the lock cylinder housing through an alignment pin or clip.
This two-piece design allows either component to be replaced independently. A worn or damaged lock cylinder can be replaced without replacing the functional contact module. A failed contact module can be replaced without changing the lock cylinder, which preserves the original key code so the driver can continue using their existing keys.
Aftermarket replacement contact modules for two-piece assemblies are common and are the correct replacement for the majority of electrical ignition switch failures on these platforms. The replacement module must match the connector pin count, the contact configuration for each position, and the transponder coil type of the original.
Integrated One-Piece Assemblies
Some vehicles use an integrated ignition switch assembly where the lock cylinder and contact module are a single unit that cannot be separated for independent service. On these platforms the entire assembly is replaced when either the mechanical or electrical portion fails. The replacement assembly is typically supplied without a coded lock cylinder, requiring the buyer to either have the new lock cylinder coded to the original key by a locksmith or to use the new key supplied with the assembly and have the immobilizer reprogrammed to the new key.
On platforms where the integrated assembly includes a transponder reader coil, replacing the assembly also requires programming the immobilizer to recognize the new transponder in the replacement key.
Installation Overview
Ignition switch assembly replacement is one of the more involved interior electrical repairs because access to the ignition switch typically requires partial or complete disassembly of the steering column trim and in many cases the steering wheel and clockspring. The installation scope varies significantly by platform, and confirming the access requirements before beginning the job prevents surprises mid-repair.
On most passenger vehicles the basic access procedure involves removing the lower steering column trim panel, disconnecting the ignition switch connector, releasing the retention mechanism that holds the contact module or complete assembly to the column housing, and removing the assembly. The lock cylinder release mechanism varies: most use a small pin hole in the column housing through which a release pin is inserted to release the cylinder retention tab while the key is in the Accessory position.
On platforms where the ignition switch is not accessible without steering wheel removal, the steering wheel air bag module must be removed first, following the restraint system deactivation procedure described earlier in this guide. The clockspring must be correctly re-centered before the steering wheel is reinstalled. Failure to re-center the clockspring will damage it when the steering wheel is turned, producing a clockspring replacement requirement on top of the ignition switch repair.
After installation, test all ignition positions before reassembling the column trim. Confirm power in Accessory, On, and Start positions. Confirm the engine cranks. On transponder-equipped vehicles, confirm the engine starts and no security warning is present. Perform any required immobilizer programming before reassembling the column trim to avoid having to disassemble it again if a programming issue arises.
On push-button start vehicles there is no physical key and no rotating lock cylinder. The ignition function is distributed across the start button, the passive entry system, and the BCM. There is no traditional ignition switch assembly in the conventional sense. The component cataloged under this function on push-button start vehicles is typically the BCM programming or the passive entry control module rather than a physical switch assembly.
However, some early push-button start designs retained a physical ignition switch in a rotary design that did not require key insertion. These assemblies are genuine ignition switch assemblies in the traditional sense and are cataloged under PartTerminologyID 4712 for the applications that use them.
Commercial and Heavy Vehicle Designs
Heavy trucks, buses, and commercial equipment use heavier-duty ignition switch assemblies designed for the higher current loads of commercial electrical systems and the more frequent use cycles of commercial operation. These assemblies typically have a higher contact current rating, more robust housing materials, and in some cases additional positions for preheat control on diesel applications. The terminal configuration and connector design differ significantly from passenger car assemblies and must be confirmed specifically for the commercial application.
Common Failure Modes
Worn Start Position Contacts
The start position contact set is actuated every time the engine is started. Over the lifetime of the vehicle on a high-mileage passenger car, this can represent tens of thousands of actuations. The start contacts wear more than any other position in the assembly because starting requires holding the key against spring tension through the full start rotation, which loads the contact surfaces more heavily than the detented positions.
Worn start contacts produce intermittent no-crank conditions that require multiple key rotation attempts before the engine cranks. The symptom is specific to the Start position. Accessory and On position circuits continue to function normally.
Run Position Contact Failure
The Run or On position contacts power the engine management system, fuel pump relay, and all primary vehicle systems. A failed Run contact set produces a condition where the engine will not start and all instrument cluster indicators remain dark when the key is in the On position. This symptom is sometimes confused with a dead battery, but battery voltage will be present at the ignition switch power input terminal even when the Run contacts have failed.
On some platforms the Run contacts are split into two groups, Run 1 and Run 2, that power different sets of circuits. Run 1 may power the instrument cluster, body control circuits, and accessory systems, while Run 2 powers the engine management system, fuel system, and emissions control circuits. A partial Run contact failure that affects only Run 1 or Run 2 may produce a specific symptom pattern, such as the engine running but the instrument cluster not functioning, or the fuel pump not priming but the instrument cluster illuminating normally. Identifying which run contact group has failed requires testing output voltage at the specific terminals corresponding to each run group.
This split-run architecture is more common on vehicles from the 1990s and early 2000s than on current platforms, where the BCM has taken over circuit distribution management. However, it remains present on many vehicles still in active service and must be considered when diagnosing a partial On-position failure.
Accessory Position Contact Failure
A failed Accessory contact set is the least disruptive of the contact failures because it only affects use of the vehicle's entertainment and comfort systems without the ignition on. However, on platforms where the Accessory position also powers certain safety-related circuits, a failed Accessory contact can have broader implications.
Transponder Reader Coil Failure
The transponder reader coil is a passive component that does not wear in the same way that contact sets do, but it can fail from physical damage, connector corrosion, or in rare cases from winding failure within the coil element. A failed transponder coil produces a specific symptom: the engine cranks normally but will not start, and the instrument cluster shows an engine security or immobilizer warning. All ignition positions may work correctly from an electrical circuit standpoint, but the engine will not run because the immobilizer is not receiving a valid transponder signal.
Lock Cylinder Wear
The lock cylinder tumblers and key way wear over time as the key is inserted and removed thousands of times. A worn lock cylinder may allow the key to be turned without fully reaching the defined positions, causing the contact module to be in an intermediate position between detents. This can produce contacts that are partially closed, generating arcing and accelerating contact wear. A worn lock cylinder may also allow certain keys other than the programmed key to operate the vehicle, which compromises security.
Ignition Switch Housing Breakage
On vehicles with a tilt or telescoping steering column, the ignition switch housing may be subjected to inadvertent side loads from the driver's knee or hand when operating the column adjustment. Over time these loads can crack the housing or loosen the assembly from the column, causing the contact module to shift position relative to the lock cylinder and producing intermittent contact.
Symptoms of a Failing Ignition Switch Assembly
No Crank, All Electrical Circuits Normal
The engine does not crank when the key is rotated to Start, but all Accessory and On position circuits function normally. This pattern isolates the fault to the Start position contact set or the starting circuit downstream of the switch. Test S terminal voltage at the solenoid while the key is in Start to confirm whether the switch is producing the start signal. If S terminal voltage is present, the start contact is functioning and the fault is in the solenoid, relay, or motor. If S terminal voltage is absent with the key held in Start, trace the circuit back through the neutral safety switch and starter relay to the ignition switch start terminal.
No Power in On Position
When the key is in the On position, the instrument cluster does not illuminate and no engine management circuits receive power. This symptom points to a Run contact failure in the ignition switch. Confirm battery voltage is present at the ignition switch supply terminal before condemning the switch, as the same symptom can be produced by a blown ignition fuse. On platforms with Run 1 and Run 2 contacts, test power at specific circuit groups to identify which run contact set has failed.
Engine Cranks but Does Not Start, Security Warning Illuminated
The engine turns over at normal cranking speed but does not fire, and the instrument cluster shows a security or immobilizer warning. This specific combination of symptoms points to a transponder reader coil failure or an immobilizer module fault rather than a contact failure. The ignition switch contacts are working correctly enough to initiate cranking, but the immobilizer is preventing the PCM from enabling fuel and ignition. Retrieve immobilizer DTCs before replacing the switch assembly.
Accessories Do Not Work with Key in Accessory Position
The radio, windows, or other accessories that should be powered in the Accessory position are not powered, but On and Start positions work normally. This symptom isolates the fault to the Accessory contact set within the switch assembly. On platforms where the accessory position also supplies the retained accessory power feature, confirm whether the accessory circuits are unpowered in both the key-in and retained power conditions before condemning the switch.
Steering Wheel Locked After Key Removal
The steering column does not lock when the key is removed, or does not unlock when the key is inserted. Both conditions indicate a fault in the column lock interface. Failure to lock is a security concern. Failure to unlock is a safety concern because the driver cannot steer the vehicle if the lock engages while driving. On electronic column lock systems, scan for BCM fault codes referencing the column lock actuator before inspecting the mechanical components.
Intermittent Power Loss While Driving
If the engine stalls or electrical systems lose power intermittently while driving without any key movement, the Run contact set is producing an intermittent open under road vibration or thermal cycling. This is a more serious symptom than a no-start condition because it can cause unexpected engine shutdown at speed. Reproduce the symptom by tapping the steering column near the ignition switch while the engine is idling to check for a vibration-induced dropout, which confirms a loose or failing Run contact.
Diagnostic Process
Step One: Map the Symptom to the Position
The most important first step in diagnosing an ignition switch assembly fault is mapping the symptom to the specific ignition position that is failing. A symptom that occurs only in Start points to the Start contact. A symptom in On points to the Run contacts. A security warning on start points to the transponder circuit. A mechanical symptom in the column lock points to the lock cylinder or column lock interface. This mapping focuses the diagnosis and determines whether the complete assembly must be replaced or only the contact module. On two-piece assemblies this distinction has a meaningful cost impact because replacing only the contact module is considerably less expensive than replacing the complete assembly including the lock cylinder.
Step Two: Test Supply Voltage at the Switch
Confirm battery voltage is present at the ignition switch power input terminal with the key in the appropriate position. An absent supply voltage at the switch input points to a fuse or wiring fault upstream of the switch rather than a switch contact failure. On platforms where the ignition switch supply is routed through a fusible link, a failed fusible link produces the same symptom as a completely failed switch. The fusible link must be tested before the switch is removed.
Step Three: Test Output Voltage at Each Position
With the ignition key in each position, measure output voltage at the terminal corresponding to that position. A position that shows correct supply voltage at the input but absent output voltage confirms a contact failure at that position. A position that shows correct output voltage confirms the contacts are functional. Document each position result before concluding which contact set has failed, as partial failures that affect only one of the run contact groups require testing all positions to identify the specific fault.
Step Four: Test the Transponder Circuit
If the symptom includes an engine security warning, use a scan tool to retrieve immobilizer DTCs. A transponder not recognized or transponder signal absent code confirms a transponder circuit fault. Test resistance of the reader coil circuit at the connector to confirm coil continuity. A reader coil that shows infinite resistance (open circuit) has failed internally and requires replacement of the switch assembly or the coil element if it is separately serviceable. A coil that shows correct resistance but the immobilizer still reports a fault may indicate a frequency or protocol mismatch between the coil and the module, which requires verifying the coil specification against the immobilizer module's requirements.
Step Five: Inspect the Lock Cylinder and Column Lock
If mechanical symptoms are present alongside electrical symptoms, inspect the lock cylinder for wear, sticking, or binding. Confirm the column lock actuator extends and retracts correctly at the lock and unlock positions. Mechanical faults in the lock cylinder can cause premature electrical contact wear because a binding cylinder may force the contact module cam past the correct detent position, over-traveling the contacts and accelerating their wear rate. Mechanical faults must be addressed before or alongside the electrical replacement to prevent recurrence.
Cataloging Attributes: What to Confirm Before Listing
Contact module configuration: State the number of ignition positions the assembly supports and the contact set configuration for each. State whether the assembly uses Run 1 and Run 2 contact sets or a single Run contact. State the contact current rating for each position. This is the most fundamental electrical compatibility attribute and must be confirmed from the OE specification.
Transponder coil inclusion and frequency: State whether the assembly includes a transponder reader coil. State the transponder frequency (125 kHz, 134 kHz, or other) and the protocol (Texas Instruments DST, Megamos, Hitag, or other). A coil with the wrong frequency or protocol will not communicate with the vehicle's immobilizer module regardless of physical fit.
Lock cylinder inclusion: State explicitly whether the lock cylinder is included with the replacement assembly or whether only the electrical contact module is supplied. This is the most common source of returns on ignition switch assembly listings. A buyer who expects a complete assembly and receives only the contact module cannot complete the installation without a separately sourced lock cylinder.
Column lock compatibility: State whether the assembly includes the mechanical column lock interface and confirm compatibility with the vehicle's column lock mechanism. On platforms with an electronic column lock, state whether the assembly includes the electronic lock actuator or only the mechanical components.
Steering column compatibility: State the steering column type (tilt, telescoping, fixed) and confirm the assembly mounting dimensions are compatible. On vehicles with a removable steering column for entry and exit (common on some convertibles and specialty vehicles), confirm the assembly is compatible with the column removal mechanism.
Connector pin count and terminal assignment: State the pin count for the electrical contact module connector. Ignition switch assemblies range from eight pins on a basic two-position assembly to twenty or more pins on a fully integrated assembly with multiple run positions, start position, accessory position, transponder interface, and column lock control.
Key profile compatibility: On assemblies that include a lock cylinder, state whether the lock cylinder is pre-coded to a specific key or whether it is supplied in the uncoded state requiring locksmith coding. State the key profile family or blank number to confirm key availability for the buyer.
Common Cataloging Mistakes
The most common and most impactful mistake is not stating whether the lock cylinder is included. On a significant portion of aftermarket ignition switch assembly listings, only the electrical contact module is supplied, but the listing describes the product as an ignition switch assembly without clearly indicating that the lock cylinder is not included. Buyers who receive the contact module without the lock cylinder cannot install it without the original lock cylinder, which may be unavailable or damaged. This single omission generates more returns in this PartTerminologyID than any other attribute error.
The second mistake is omitting the transponder coil specification. On platforms where both a transponder-equipped and a non-transponder ignition switch were offered, a listing that does not state transponder inclusion will route non-transponder assemblies to transponder-equipped vehicles. The installation appears successful, all electrical positions function correctly, and the engine cranks, but the immobilizer prevents starting and illuminates the security warning. This return requires uninstalling the replacement assembly and installing a transponder-equipped unit, generating a second order and a second installation event.
The third mistake is not distinguishing between one-piece and two-piece assembly designs on the same vehicle platform. Some platforms transitioned from a two-piece to a one-piece ignition switch assembly during the production run. A two-piece replacement installed in a one-piece application, or vice versa, will not fit correctly. The listing must state the assembly type and any production date breakpoints where the design changed.
The fourth mistake is not confirming key profile compatibility when a coded lock cylinder is included. Supplying an assembly with a lock cylinder coded to a different key profile than what the vehicle uses requires the buyer to have the cylinder re-coded, which may not be possible for all key profiles at all locksmith locations. Stating the key profile family and confirming availability prevents this issue.
The fifth mistake is omitting the column lock compatibility designation on platforms where both column lock and non-column lock versions of the assembly were used. In North America, steering column locks were phased out on some platforms to comply with updated theft protection regulations, while other markets retained them. An assembly without a column lock interface installed in a column lock application will leave the lock mechanism non-functional, which is a security compliance issue.
Related Components and Systems
Immobilizer Module
The immobilizer module processes the transponder signal from the reader coil and determines whether the key is authorized. It communicates its decision to the ECM or PCM, which enables or prevents fuel injection based on the immobilizer output. A failed immobilizer module can produce symptoms identical to a failed transponder reader coil because both produce the same result: the ECM does not receive authorization to enable starting. DTCs in the immobilizer module distinguish between a reader coil fault and a module fault.
BCM and Key Programming
On modern vehicles where the BCM manages the immobilizer function, a replacement ignition switch assembly that includes a new transponder reader coil requires the BCM to be programmed to recognize the new coil's operating parameters. On some platforms this programming also includes encoding the new key's transponder chip. The programming procedure varies from a simple key-cycling sequence on older platforms to a dealer-level programming event with a specific scan tool on current platforms. Confirming programming requirements before installation prevents a situation where a correctly specified and installed assembly still does not start the vehicle because programming was not performed.
Steering Column Assembly
The ignition switch assembly mounts to the steering column housing and its installation is affected by the column's tilt and telescoping adjustments, if present. On some platforms removing the ignition switch assembly requires partial disassembly of the steering column, including removing the column trim panels, the steering wheel, the clockspring, and in some cases the combination switch assembly. Understanding the installation scope before ordering prevents situations where a simple switch replacement turns into a multi-hour disassembly due to access requirements that were not anticipated.
Clockspring and Combination Switch
The clockspring (also called the spiral cable) maintains electrical continuity to the horn, airbag, and steering wheel controls through the full steering rotation range. It is mounted on the steering column behind the steering wheel and in front of the ignition switch assembly. On some platforms the clockspring must be removed to access the ignition switch assembly. Whenever the clockspring is disturbed during ignition switch service, it must be correctly re-centered before the steering wheel is reinstalled to prevent clockspring damage during steering operation.
Frequently Asked Questions
Do I need to reprogram the immobilizer after replacing the ignition switch assembly?
On any vehicle with a transponder-based immobilizer, the answer depends on whether the replacement assembly includes a new transponder reader coil. If the replacement includes a new reader coil with the same frequency and protocol as the original, and the original keys are used, programming may not be required on some platforms. If the replacement requires new keys or includes a coil with different parameters, immobilizer programming is required. Confirm the programming requirements from the vehicle service documentation before installation to avoid a situation where the vehicle does not start after a correctly installed replacement.
Can I use an ignition switch assembly from a salvage vehicle?
A salvage ignition switch assembly can be used if it is from the same platform with the same contact module configuration and the same transponder coil specification. However, using a salvage assembly with its original lock cylinder means the vehicle will require either the salvage assembly's key or a locksmith re-coding to operate with the original key. On vehicles with an immobilizer, the salvage assembly's transponder coil frequency must match the vehicle's immobilizer module. Using a salvage assembly is generally not recommended for vehicles with a transponder immobilizer because of the programming complexity involved.
Why does my car crank but not start after replacing the ignition switch assembly?
A crank-no-start condition after ignition switch replacement most commonly indicates a transponder compatibility issue. The ignition switch contacts are working correctly, the starter is cranking, but the immobilizer is not receiving a valid transponder signal and is preventing the PCM from enabling fuel and ignition. Retrieve immobilizer DTCs with a scan tool to confirm. If a transponder fault code is present, verify that the replacement assembly includes a compatible transponder reader coil and that immobilizer programming has been performed if required.
My key feels loose in the ignition after the contact module was replaced. What is the cause?
Looseness in the key after contact module replacement indicates that the contact module was not correctly seated against the lock cylinder housing, or that the alignment pin or retention clip that connects the contact module to the lock cylinder is not fully engaged. Remove the contact module and reseat it, confirming the retention mechanism is fully engaged. A contact module that is not correctly seated will also produce intermittent electrical contact because the actuating pin between the lock cylinder and the contact module will not travel through the correct range of motion.
Is it safe to drive with a partially failing ignition switch assembly?
Driving with a partially failing ignition switch is not recommended. A contact that intermittently opens in the Run position while driving can cause the engine management system to lose power momentarily, potentially causing the engine to stall at speed. A column lock that does not engage correctly after key removal is a security concern. A transponder reader coil that intermittently fails may leave the vehicle unable to restart after a stop. Any of these partial failure conditions should be addressed before continuing regular use of the vehicle.
Status in New Databases
PIES/PCdb: PartTerminologyID 4712, Ignition Switch Assembly
PIES 8.0 / PCdb 2.0: No change in PartTerminologyID or terminology label
Summary
The ignition switch assembly is the most functionally complex component in the switches category and one of the most return-prone when catalog listings are incomplete. It controls circuit distribution across all ignition positions, provides the transponder interface for the immobilizer system, and integrates with the mechanical steering column lock. All three of these functions must be correctly addressed in the catalog listing for the replacement to restore complete vehicle function.
The attributes that most commonly drive returns are the lock cylinder inclusion designation, the transponder coil specification, and the distinction between one-piece and two-piece assembly designs. Every listing for PartTerminologyID 4712 must state whether the lock cylinder is included, whether a transponder reader coil is included and its frequency and protocol, the contact configuration for each ignition position, and the connector pin count. These are not optional attributes. On a component where an incorrect replacement produces a no-start condition that requires a second parts order, dealer-level programming, and an additional service visit, the cost of catalog attribute omission is higher than on almost any other switch PartTerminologyID.
PartTerminologyID 4712, Ignition Switch Assembly, rewards thorough catalog attribute completeness with confident buyer purchases and low return rates. It penalizes incomplete listings with high return rates and damaged buyer trust. The attributes covered in this guide provide the foundation for listings that fall into the first category.