Radio Dial Light Socket (PartTerminologyID 4108): Where Panel Lighting Circuit Validation and Radio Architecture Prevent Socket Replacement
Written by Arthur Simitian | PartsAdvisory
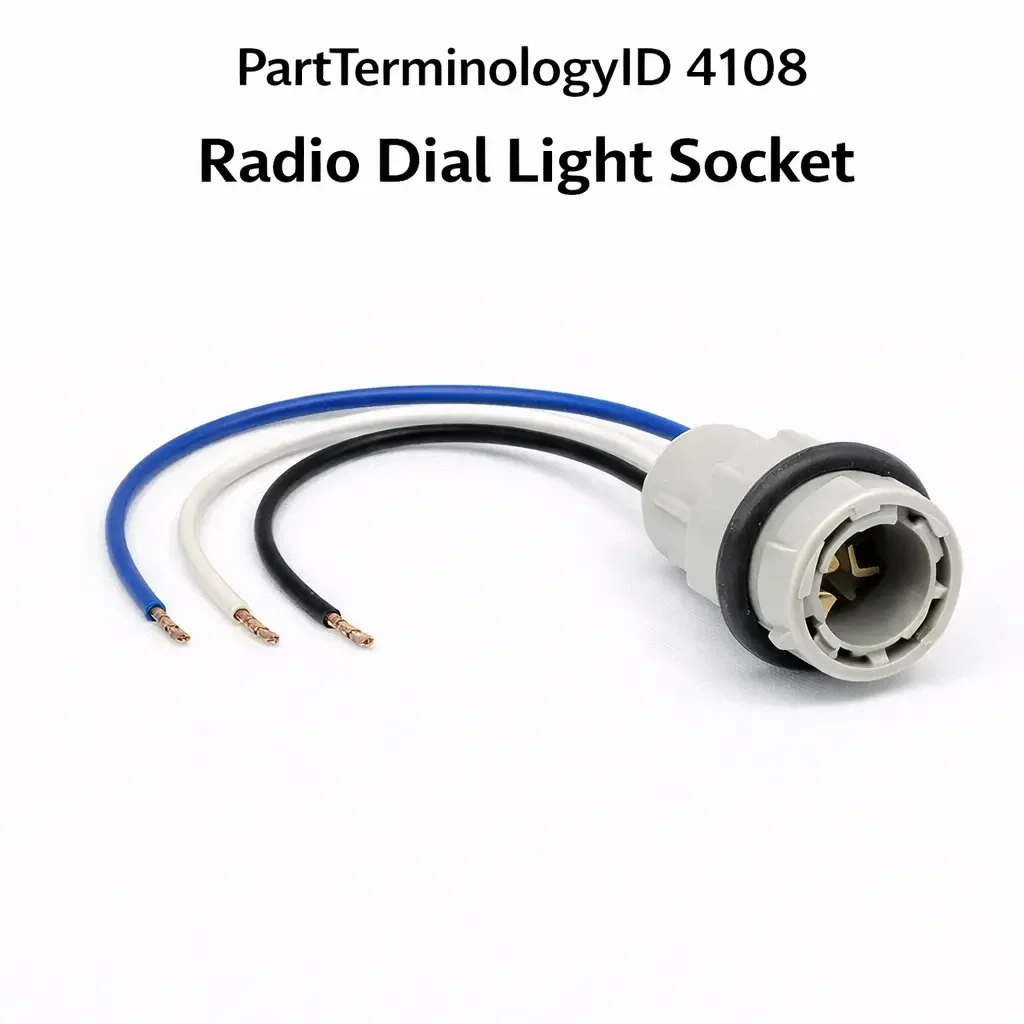
PartTerminologyID 4108, Radio Dial Light Socket, is the bulb socket that provides backlighting or dial illumination to the analog radio tuning dial, frequency scale, or station display panel on the vehicle radio head unit, receiving switched power from the instrument panel lighting circuit when the parking lamps or headlamps are activated to make the radio controls and display readable in low-light conditions. That definition covers the radio dial light socket function correctly and leaves unresolved whether the socket illuminates an analog dial face behind a translucent scale, provides backlight to a push-button station preset row, or illuminates a frequency display window through a lens element within the radio housing, the bulb base type the socket accepts including wedge, bayonet, or festoon in the small sizes typical of radio dial illumination, whether the radio dial lighting circuit is switched by the instrument panel dimmer circuit and responds to dimmer adjustments or is on a fixed brightness supply that does not dim with the panel controls, whether the socket is accessible from the front of the radio unit by removing the dial face or requires radio removal from the dash and access from the rear of the radio housing, and whether the radio uses a discrete replaceable socket or has an integrated dial illumination circuit on an internal PCB that cannot be serviced at the socket level without radio disassembly or replacement.
For sellers, PartTerminologyID 4108 is the radio dial light socket where the instrument panel dimmer condition is the most return-generating attribute, because the radio dial lighting circuit on most applications is connected to the instrument panel dimmer circuit and the dimmer setting directly controls illumination intensity. A buyer who has set the instrument panel dimmer to minimum will find no radio dial illumination on a correctly functioning socket. A buyer who tests radio dial illumination without the headlamps active will find no illumination on a correctly functioning parking-lamp-switched socket. Both conditions are identical in symptom to a failed socket and both are resolved without any part replacement by correcting the test condition.
What the Radio Dial Light Socket Does
Panel lighting-switched supply and the dimmer control relationship
The radio dial lighting circuit receives its supply from the instrument panel lighting branch, which activates when the parking lamps or headlamps are on and which is typically controlled by the instrument panel dimmer rheostat. When the dimmer is set to maximum the panel lighting supply voltage is at its highest and the radio dial, gauge cluster backlighting, and other instrument panel lamps are at full brightness. As the dimmer is reduced toward minimum the supply voltage decreases and all panel-switched lamps dim proportionally. At the minimum dimmer position the supply voltage may be reduced to near zero, producing no visible illumination from any panel-switched socket including the radio dial light socket.
A buyer who cannot see the radio dial at night and tests with the dimmer at minimum will find no illumination from a correctly functioning socket. Adjusting the dimmer to mid-range is the correct first step before diagnosing any panel-switched socket including the radio dial light socket. This single step resolves the complaint in a meaningful share of radio dial light complaints without any part replacement.
Discrete replaceable socket versus integrated radio PCB illumination
The discrete replaceable radio dial light socket is the applicable architecture under PartTerminologyID 4108. On analog and early digital radios from the 1970s through the early 2000s the dial illumination was provided by one or more small bulbs in discrete socket positions accessible from the rear of the radio unit. These sockets twist or pull from the radio housing and the bulb is replaceable independently of the socket. Radio removal from the dash is typically required to access the rear socket positions.
Current-generation radio head units and infotainment systems use integrated backlit LCD or OLED displays where the illumination is provided by the display panel itself rather than a discrete bulb socket. On these applications PartTerminologyID 4108 does not apply and a dark radio display requires display module or head unit replacement. The application range for discrete replaceable radio dial light sockets is concentrated in vehicles produced before approximately 2005 on most platforms.
Radio removal and the access requirement
Accessing the radio dial light socket from the rear of the radio housing requires removing the radio from the dash. On most applications this involves removing the dash trim panel surrounding the radio, releasing the radio retaining clips or screws, pulling the radio forward, disconnecting the wiring harness and antenna connector, and then accessing the socket positions on the rear panel of the radio. The effort required for radio removal is often underestimated by buyers who purchase a socket expecting a straightforward access path and then find the removal more involved than anticipated. The listing should note the radio removal requirement so buyers are prepared for the procedure before the socket arrives.
Why This Part Generates Returns
Buyers return radio dial light sockets because the instrument panel dimmer is at minimum and the radio dial illumination is correctly absent on a functional socket, the parking lamps are not active during testing and the panel-switched socket correctly receives no supply voltage, the radio dial illumination circuit is integrated into the radio PCB and no discrete socket exists, the radio dial light bulb has failed and the socket is undamaged so a bulb replacement is the correct repair, and the buyer ordered the correct socket but did not anticipate the radio removal procedure required to access the socket position and returns it as impractical to install.
Status in New Databases
PartTerminologyID 4108 is cataloged in PIES/PCdb as Radio Dial Light Socket. Under PIES 8.0 and PCdb 2.0 there is no change to the terminology or classification for this PartTerminologyID.
Top Return Scenarios
Scenario 1: "Panel dimmer at minimum, radio dial dark, socket replaced with no change"
The buyer's radio dial is dark at night. The instrument panel dimmer has been set to minimum. The panel lighting supply voltage is at near zero. The radio dial light socket receives no usable supply voltage. The buyer replaces the socket. The dimmer remains at minimum. The replacement socket also produces no illumination.
Prevention language: "Dimmer control check: Before diagnosing the radio dial light socket, confirm the instrument panel dimmer is not set to minimum brightness. A dimmer at minimum reduces the panel lighting supply voltage to near zero, producing no illumination from a correctly functioning socket. Set the dimmer to mid-range with the headlamps active and confirm whether radio dial illumination appears before ordering a socket replacement."
Scenario 2: "Headlamps off during testing, panel-switched socket inactive, misdiagnosed as socket fault"
The buyer tests the radio dial illumination with the ignition on and headlamps off. The panel-switched socket receives no supply voltage without the headlamps or parking lamps active. No dial illumination is produced. The buyer replaces the socket. Testing continues without the headlamps on. No change.
Prevention language: "Switching circuit: The radio dial light socket is switched by the instrument panel lighting circuit and activates only when the parking lamps or headlamps are on. No dial illumination with the ignition on and headlamps off is correct operation for this application. Confirm the headlamps or parking lamps are active before testing socket function."
Scenario 3: "Failed radio dial bulb, functional socket, socket returned after bulb replacement resolves dark dial"
The radio dial is dark with the headlamps on and the dimmer at mid-range. Supply voltage is confirmed at the socket terminal. The small wedge bulb inside the socket has a failed filament. The buyer replaces the socket assembly. The dial illuminates. The buyer returns the original socket as defective when the bulb was the failed component.
Prevention language: "Bulb pre-check: Remove the radio dial light socket from the radio housing and inspect the bulb filament before replacing the socket. Radio dial light bulbs are small low-wattage components that fail more frequently than the socket housing. Test the bulb directly with 12-volt power before concluding the socket is the fault. Replace the bulb before ordering a socket."
Scenario 4: "Integrated radio PCB illumination, no discrete socket, ordered part has no installation point"
The buyer's radio dial is dark. The radio uses an integrated backlit display with illumination provided by an internal PCB LED array rather than a discrete socket. The buyer orders a socket under PartTerminologyID 4108. No installation point exists. The buyer returns it as incorrect.
Prevention language: "Radio architecture check: Current radio head units and infotainment systems use integrated LCD or PCB backlighting with no discrete replaceable socket. If your radio does not have a removable socket position accessible from the rear of the housing, this PartTerminologyID does not apply. A dark radio display on an integrated system requires head unit service or replacement."
Listing Requirements
PartTerminologyID: 4108
Radio architecture: discrete replaceable socket or integrated PCB illumination (mandatory)
Bulb base type and wattage specification (mandatory)
Switching circuit: panel lighting-switched or ignition-accessory-switched (mandatory)
Dimmer control note (mandatory)
Access method: rear radio housing with radio removal required (mandatory)
Bulb pre-check note (mandatory)
Integrated radio PCB note where applicable (mandatory)
OEM part number cross-reference (mandatory)
Catalog Checklist for ACES/PIES Teams
PartTerminologyID = 4108
Require radio architecture: discrete socket or integrated PCB (mandatory)
Require bulb base type and specification (mandatory)
Require switching circuit identification (mandatory)
Prevent dimmer misdiagnosis: minimum dimmer setting produces no illumination from functional socket; dimmer check must precede socket diagnosis
Prevent panel lighting switching misdiagnosis: socket inactive without headlamps is correct operation; headlamp activation is required test condition
Prevent integrated PCB return: no discrete socket on integrated radio display applications; architecture must be confirmed before ordering
FAQ (Buyer Language)
Why is my radio dial not lit up at night even though the radio works?
Check the instrument panel dimmer control first. If the dimmer is set to minimum or near minimum the panel lighting supply voltage is too low to illuminate the radio dial socket. Set the dimmer to mid-range with the headlamps on and confirm whether the dial illuminates. If the dial is still dark with the dimmer at mid-range and headlamps on, probe the socket supply terminal for voltage before replacing the socket.
How do I access the radio dial light socket?
The socket is typically located on the rear panel of the radio housing. Radio removal from the dash is required in most cases. Remove the dash trim panel surrounding the radio, release the retaining hardware, pull the radio forward, disconnect the harness and antenna, and access the socket positions on the rear of the radio unit. The socket twists or pulls from its housing position.
Can I replace just the bulb without replacing the socket?
Yes on applications where the bulb is separately removable from the socket housing. Pull the bulb from the socket clips or contacts and replace it with the correct wattage specification. Radio dial light bulbs are low-wattage components that fail frequently compared to the socket housing life. A bulb replacement is the correct first step on a dark radio dial with confirmed supply voltage at the socket.
My radio has a digital display that is dark. Is it a socket issue?
A dark digital or LCD radio display is not a socket issue. Current radio head units and infotainment systems use integrated display backlighting with no discrete replaceable socket. A dark digital display requires radio head unit service or replacement rather than a socket swap.
What Sellers Get Wrong About PartTerminologyID 4108
The most common error is omitting the dimmer control check note. The instrument panel dimmer is the most common cause of absent radio dial illumination that buyers misattribute to a socket fault. A minimum dimmer setting produces no illumination from a functional socket and the replacement socket behaves identically under the same setting. The dimmer check note converts this return into a simple dimmer adjustment without any part order.
The second error is omitting the panel lighting switching condition. No radio dial illumination without the headlamps active is correct operation for a parking-lamp-switched socket. Without the switching condition note buyers test under incorrect conditions, order a replacement, and find no change.
The third error is omitting the integrated PCB architecture note. Current radio head units do not use discrete sockets and a buyer who orders under this PartTerminologyID for a current-generation vehicle has no installation point. The architecture note screens out orders from buyers whose radios do not have a discrete socket before the order is placed.
Cross-Sell Logic
Radio Dial Light Bulb: for buyers where the socket is confirmed functional, supply voltage is confirmed at the socket terminal with the headlamps and dimmer at mid-range, but the dial is dark, indicating a failed bulb filament is the correct repair.
Radio Head Unit: for buyers on integrated display radio applications where no discrete socket exists and a dark radio display requires head unit replacement or service.
Instrument Panel Dimmer Switch: for buyers where the radio dial illumination is confirmed absent at all dimmer settings with the headlamps active, and the fault traces to a failed dimmer switch rather than a socket or supply fault.
Final Take for PartTerminologyID 4108
Radio Dial Light Socket (PartTerminologyID 4108) is the radio illumination component where dimmer control check, panel lighting switching identification, integrated PCB architecture disclosure, and bulb pre-check are the four attributes that prevent the four most common return scenarios. Every listing without the dimmer check generates returns from buyers whose dimmer was at minimum. Every listing without switching circuit identification generates returns from buyers who tested without headlamps. Every listing without integrated PCB disclosure generates returns from buyers with no socket installation point. Every listing without bulb pre-check generates returns from buyers who replaced a functional socket when a bulb was the correct repair.
Together these four attributes make every listing under this PartTerminologyID complete.