Drum Brake Shoe (PartTerminologyID 1688): The Most Misinstalled Brake Component in the Aftermarket
Written by Arthur Simitian | PartsAdvisory
The drum brake shoe is a curved steel platform with friction lining (bonded or riveted) that presses outward against the inner surface of a rotating brake drum when the driver applies the brakes, converting kinetic energy into thermal energy through friction and slowing the wheel. Drum brake shoes are sold in sets - typically four shoes per axle (two shoes per wheel, two wheels per axle) - and remain one of the most consistently returned brake components in the aftermarket, not because the product is defective but because the installation complexity generates errors that the buyer attributes to the part.
The drum brake shoe occupies a peculiar position in the aftermarket. It is simultaneously a declining and a persistent product category. It is declining because disc brakes have replaced drum brakes on the front axle of virtually every passenger vehicle built since the 1970s and on the rear axle of most passenger vehicles built since the early 2000s. It is persistent because drum brakes remain the standard rear brake on millions of vehicles still in service (especially pickup trucks, economy cars, and older vehicles), drum brakes are the universal standard on trailers (utility, boat, RV, commercial, horse, equipment), and drum-in-hat parking brake designs use small drum brake shoes inside the rear disc brake rotor hat on many modern vehicles that otherwise have four-wheel disc brakes.
This means the drum brake shoe is not going away. It is being replaced less frequently than disc brake pads (PartTerminologyID 1684) in new vehicle applications, but it remains a high-volume, high-complexity product that generates returns at a rate disproportionate to its sales volume. The complexity comes from the fact that drum brake shoes are not interchangeable between positions, the hardware ecosystem is intricate, the self-adjuster mechanism must be correctly oriented, and the installation requires a level of mechanical understanding that disc brake pad replacement does not.
This post covers the product in the depth that the return rate demands: what the shoe set includes, why primary and secondary shoes exist and why swapping them is the most common installation error in the brake category, how the hardware ecosystem affects completeness, and how catalog teams can structure listings to prevent the installation failures that drive returns.
PIES/PCdb: PartTerminologyID 1688 - Drum Brake Shoe
PIES 8.0 / PCdb 2.0: No change
What Drum Brake Shoe Means in the Aftermarket
The product
A drum brake shoe consists of two components: a curved steel platform (the "web" or "table") and friction lining material bonded or riveted to the outer curved surface of the platform. The steel platform provides structural rigidity and serves as the mounting surface for all the springs, clips, levers, and linkages that make up the drum brake assembly. The friction lining is the wear surface that contacts the inner diameter of the brake drum.
Unlike disc brake pads, which are flat and relatively uniform, drum brake shoes are crescent-shaped and asymmetric. They are designed to wrap around the inside of a cylindrical drum, and the geometry of the lining, the position of the anchor point, and the location of the spring attachment holes are all specific to the brake design and the shoe's position within that design.
A "drum brake shoe" set (PartTerminologyID 1688) is typically sold as a set of four shoes - enough for one axle (two shoes per wheel, left and right). This is critical: the buyer needs to understand that four shoes per axle is the standard, and that the four shoes in the box are not all identical.
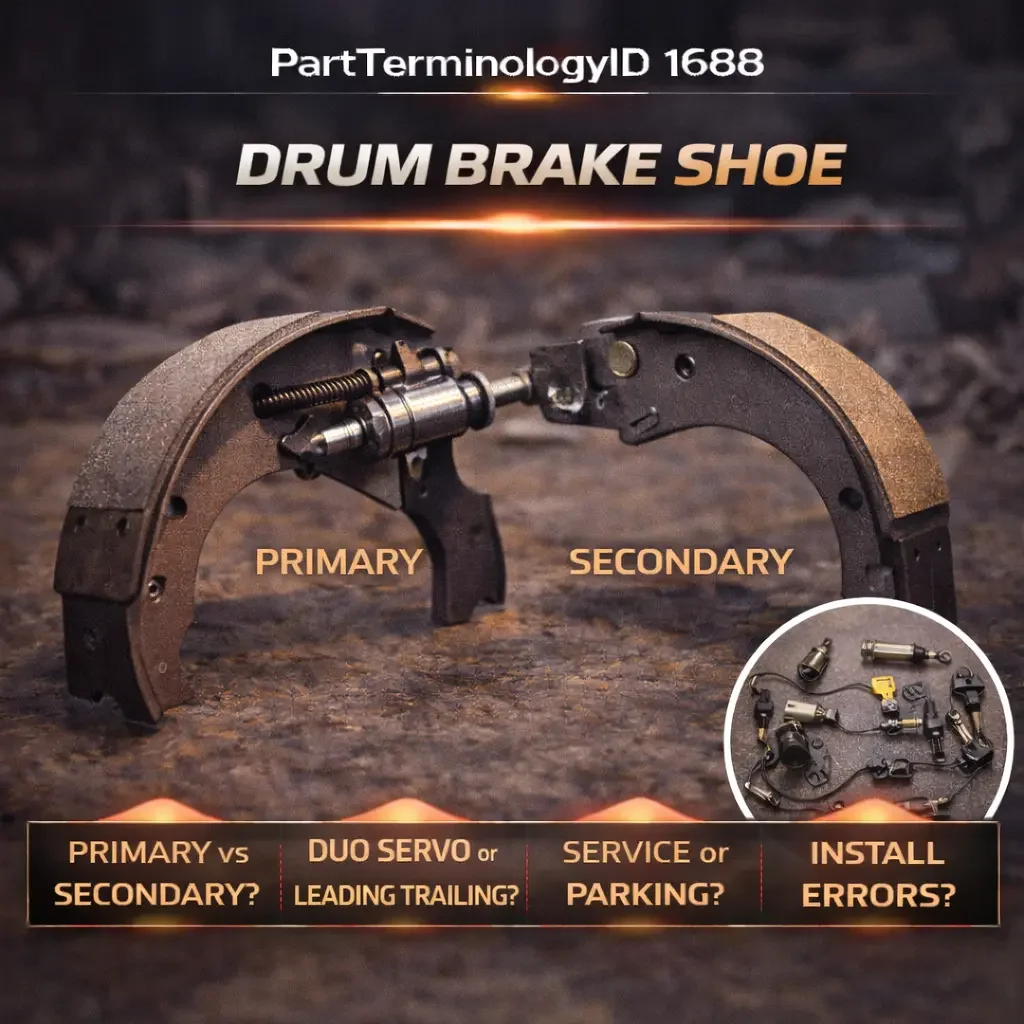
Primary versus secondary shoes - the central confusion
This is the single most important concept in the drum brake shoe category, and the single greatest source of installation errors, returns, and safety hazards.
In a duo-servo drum brake system (the most common design on American passenger vehicles from the 1960s through the 2000s), the two shoes in each wheel assembly are not the same. They are designated as the primary shoe and the secondary shoe, and they perform different functions:
The primary shoe (also called the leading shoe) faces the front of the vehicle. It has a shorter friction lining or a thinner friction lining or a different friction material than the secondary shoe. When the brakes are applied, hydraulic pressure from the wheel cylinder pushes both shoes outward. The rotation of the drum drags the primary shoe into tighter contact (self-energizing), and the primary shoe transfers this force through the adjuster linkage at the bottom of the assembly to the secondary shoe.
The secondary shoe (also called the trailing shoe) faces the rear of the vehicle. It has a longer friction lining or a thicker friction lining than the primary shoe. The secondary shoe does most of the actual stopping work. It receives the amplified force from the primary shoe (through the adjuster linkage) plus the direct force from the wheel cylinder, and it is wedged against the anchor pin at the top of the assembly. The secondary shoe also typically carries the parking brake lever attachment.
The primary shoe has less lining because it does less stopping work - its main job is to self-energize and drive force into the secondary shoe. The secondary shoe has more lining because it absorbs the majority of the braking energy. If the shoes are reversed (primary in the secondary position, secondary in the primary position), the braking system will still function, but with dramatically reduced stopping power (documented at up to 40% less braking effectiveness), increased noise, accelerated uneven wear, brake drag, and a pull to one side if only one wheel is reversed. The buyer will perceive the vehicle as having "bad brakes" and return the shoes as defective.
Leading/trailing versus duo-servo
Not all drum brakes use the duo-servo design. Front-wheel-drive vehicles with rear drum brakes commonly use a leading/trailing design, where the two shoes may be the same size or may differ in lining thickness but function differently than in a duo-servo system. In a leading/trailing design:
The leading shoe (facing the front of the vehicle) is self-energizing in forward motion - the drum rotation pulls it into tighter contact. The trailing shoe (facing the rear of the vehicle) is self-de-energizing in forward motion - the drum rotation pushes it away from contact. This design provides more balanced braking in forward and reverse (important for parking brakes) and is simpler to service, but it generates less total braking force than a duo-servo design.
On leading/trailing brakes, the shoes may or may not be interchangeable between the leading and trailing positions. Some applications use identical shoes; others use shoes with different lining thicknesses to compensate for the unequal wear rates between the self-energizing and self-de-energizing positions.
Drum-in-hat parking brake shoes
Many modern vehicles with four-wheel disc brakes use a small drum brake assembly inside the "hat" (center section) of the rear disc brake rotor for the parking brake function only. These shoes are smaller, thinner, and have a much smaller drum diameter than service drum brake shoes. They are not used for normal service braking - only for holding the vehicle stationary when parked. These shoes are a separate PartTerminologyID in some catalogs but may also appear under PartTerminologyID 1688 with a "parking brake" designation.
The confusion arises when the buyer searches for "rear brake shoes" and receives parking brake shoes instead of service brake shoes (or vice versa). This is a common catalog overlap that generates returns.
What Is Included in a Drum Brake Shoe Set
The contents of the box vary dramatically by manufacturer and product tier, and this variation is an even larger source of confusion in the drum brake category than in the disc brake pad category (PartTerminologyID 1684) because the drum brake hardware ecosystem is far more complex.
Shoes only
Four brake shoes (two primary, two secondary) with friction lining pre-bonded or pre-riveted. No springs, no hardware, no adjuster components. The buyer must reuse all existing hardware or purchase a separate hardware kit. This is the most basic (and most return-prone) product offering, because the buyer who orders "shoes only" frequently discovers during disassembly that their return springs are stretched, their hold-down springs are corroded, their adjuster cable is frayed, or their self-adjuster lever is worn - and they cannot reassemble the brakes without ordering additional parts and waiting for delivery.
Shoes with hardware kit
The shoes plus a complete hardware kit: return springs (upper and lower), hold-down springs and pins, self-adjuster cable or link, self-adjuster lever, self-adjuster lever spring, adjuster screw assembly (star wheel), shoe-to-shoe spring, parking brake strut and spring, and all retaining clips and washers. This is the recommended product configuration. Every piece of hardware in a drum brake assembly is a spring, a clip, or a friction surface that degrades over time. Return springs lose tension and do not fully retract the shoes, causing drag. Hold-down springs lose tension and allow the shoes to shift on the backing plate, causing noise and uneven wear. Adjuster cables fray and break. Adjuster levers wear at the pivot point and fail to advance the star wheel. Replacing shoes without replacing hardware is the drum brake equivalent of putting new tires on bent rims.
Shoes with partial hardware
Some kits include return springs and hold-down springs but not the self-adjuster components or the parking brake hardware. This intermediate configuration addresses the most common hardware failures but may leave the buyer without the adjuster cable or lever they need.
The adjuster screw assembly question
The adjuster screw assembly (star wheel adjuster) is the threaded mechanism at the bottom of the drum brake assembly that sets the shoe-to-drum clearance. It consists of a threaded bolt with a star wheel (notched wheel) and two slotted end caps that engage the shoe webs. The adjuster screw is left-hand thread on one side of the vehicle and right-hand thread on the other side. This is critical: the left and right adjusters are not interchangeable. Installing the wrong-side adjuster will cause the self-adjuster mechanism to loosen the shoes instead of tightening them, resulting in a progressively longer brake pedal and reduced braking effectiveness.
Some shoe sets include the adjuster screw assembly; most do not. The listing must state whether the adjuster is included and, if not, whether the buyer should inspect and reuse the existing adjuster (cleaning the threads and applying anti-seize) or order a replacement.
The Hardware Ecosystem Problem
Drum brake hardware is the most complex hardware ecosystem in the brake category. A single wheel's drum brake assembly can contain 15 to 25 individual hardware components: two return springs (primary and secondary, often different spring rates), two hold-down springs with pins and retainers, an adjuster cable or link, an adjuster cable guide, an adjuster lever, an adjuster lever spring, an adjuster screw assembly with star wheel and end caps, a shoe-to-shoe spring, a parking brake strut, a parking brake strut spring, a parking brake lever with pivot pin, wave washer, and retaining clip.
Each of these components has a specific orientation, a specific position, and a specific function. The return springs must be installed on the correct shoes (the primary return spring and secondary return spring may have different tension ratings and hook geometries). The adjuster cable must route through the cable guide and over the anchor pin in a specific path. The adjuster lever must engage the star wheel at the correct angle. The parking brake lever must attach to the secondary shoe (not the primary shoe).
The complexity of this hardware ecosystem creates two listing problems:
Problem one: What is included? The buyer must know exactly what hardware is in the box to determine whether they can complete the job. A shoe set without hardware requires a separate hardware kit purchase. A shoe set with "hardware" that does not include the adjuster cable means the buyer cannot complete the job if their existing cable is frayed. The listing must itemize the included hardware or, at minimum, provide an image showing all box contents.
Problem two: Assembly reference. Even with all the correct hardware, the buyer must know how to assemble it. The most successful drum brake shoe listings include an exploded diagram showing the position of each component, or at minimum a note directing the buyer to photograph the existing assembly before disassembly. The single best installation advice for drum brake shoes, repeated in every repair manual and every technician training program, is: disassemble one side at a time and use the undisassembled side as a reference for reassembly.
The Packaging Trap
Drum brake shoes are typically packaged as two primary shoes together and two secondary shoes together - not as left-side pairs and right-side pairs. The buyer who assumes the box contains "a pair for the left and a pair for the right" (the way many people naturally think about brake components) will install two primary shoes on one side and two secondary shoes on the other side, or install the primary shoe in the secondary position on both sides.
This packaging convention exists because the primary and secondary shoes are different parts (different lining lengths, different friction materials, sometimes different backing plate shapes) and separating them in the box makes manufacturing and quality control simpler. But it creates a consistent installation error pattern that has been documented in forums, training materials, and warranty data for decades.
The listing can address this by noting: "This set contains 2 primary (short lining) shoes and 2 secondary (long lining) shoes. Each wheel uses one primary and one secondary shoe. Primary shoe installs in the forward position; secondary shoe installs in the rearward position. Do not install two identical shoes on the same wheel."
Friction Material Formulations
Drum brake shoe friction materials parallel the disc brake pad formulations covered in PartTerminologyID 1684 but with some drum-specific considerations:
Non-Asbestos Organic (NAO). The most common formulation for passenger vehicle drum brake shoes. Quiet, moderate wear life, gentle on drums. Appropriate for rear drum brakes on passenger vehicles used for daily commuting.
Semi-metallic. Higher metallic content for improved heat dissipation and fade resistance. Used on trucks, commercial vehicles, and applications with higher braking loads. Noisier and more aggressive on drum surfaces than NAO.
Ceramic. Less common in drum brake applications than in disc brake applications, but available for some passenger vehicle applications. Lower dust, quieter operation, longer wear life.
Bonded versus riveted. The friction lining can be bonded (glued) to the shoe platform or riveted. Bonded linings provide full lining thickness before replacement is needed (the entire lining wears down to the backing plate). Riveted linings must be replaced when the lining wears to within 1/16 inch of the rivet heads, because exposed rivets will score the drum. Riveted linings are more common on heavy-duty and commercial applications because the riveted attachment is more resistant to separation under extreme heat and mechanical stress. Most passenger vehicle aftermarket shoes use bonded linings.
The Drum Condition Factor
New shoes installed on a worn, scored, out-of-round, or bell-mouthed drum will not perform correctly. The shoe lining is manufactured to match a specific drum inner diameter. If the drum has worn beyond its maximum diameter specification, the shoes cannot make full contact with the drum surface, resulting in reduced braking, noise, and uneven wear.
Scored drums: Grooves cut into the drum surface by worn-out shoes (or debris) prevent the new shoe lining from making flush contact. The drum must be resurfaced (turned on a brake lathe) or replaced.
Out-of-round drums: A drum that is no longer perfectly circular (typically from heat distortion or uneven tightening of the wheel nuts) will cause pulsation and uneven shoe contact. Out-of-round is measured with a drum micrometer and must not exceed the manufacturer's specification (typically 0.005 inches maximum).
Bell-mouthed drums: The open end of the drum flares outward from heat and centrifugal force, creating a taper. The shoes contact only the closed end of the drum, causing uneven wear and noise. Bell-mouthing is measured by comparing the drum diameter at the open end versus the closed end.
Maximum diameter: Every drum has a maximum allowable inner diameter stamped or cast into the drum. If the drum has worn or been machined past this diameter, it must be replaced - it cannot be safely reused regardless of surface condition. A drum that is at or near maximum diameter will be too thin to absorb braking heat, will distort more easily, and may crack.
The listing should note: "For best results, install new shoes on new or properly resurfaced drums. Inspect drum for scoring, out-of-round, bell-mouthing, and maximum diameter before installation."
Top Return Causes
1) Primary and secondary shoes reversed
The most common drum brake installation error and the most common return cause. The buyer installs the secondary (long lining) shoe in the primary (forward) position and the primary (short lining) shoe in the secondary (rearward) position. The result is reduced stopping power, noise, uneven wear, and possible brake drag or pull. The buyer perceives defective shoes.
Prevention: "Primary shoe (shorter lining) installs in the FORWARD position. Secondary shoe (longer lining) installs in the REARWARD position. Reversing the shoes reduces braking effectiveness by up to 40%. If your shoes have different lining lengths, the shorter lining always faces the front of the vehicle." Include a diagram or reference image showing correct shoe orientation.
2) Hardware not included, buyer cannot complete the job
The shoe set does not include springs, hold-down hardware, adjuster components, or parking brake hardware. The buyer discovers during disassembly that their existing hardware is damaged, stretched, corroded, or missing, and cannot complete the repair without ordering additional parts.
Prevention: Hardware inclusion clearly stated: "Includes: [itemized list of hardware]" or "Shoes only - hardware not included. We recommend replacing all brake hardware with every shoe replacement. See [hardware kit cross-reference part number]." For shoes-only listings: "Before beginning the job, inspect all return springs, hold-down springs, adjuster cable, adjuster lever, and parking brake hardware. Order replacements for any worn or damaged components before disassembling the brakes."
3) Wrong adjuster screw side (left-hand thread versus right-hand thread)
The buyer replaces the adjuster screw assembly and installs the wrong side. The self-adjuster mechanism loosens the shoes instead of tightening them, resulting in a progressively longer brake pedal and eventual brake failure. This is a safety-critical error.
Prevention: "Adjuster screw assemblies are side-specific. Left-hand thread for one side, right-hand thread for the other. Verify the thread direction matches the side of the vehicle before installation. Installing the wrong-side adjuster will cause the brakes to self-loosen instead of self-tighten."
4) Parking brake shoes ordered instead of service brake shoes (or vice versa)
The buyer searches for "rear brake shoes" on a vehicle with rear disc brakes and a drum-in-hat parking brake. They receive small parking brake shoes when they expected full-size service shoes, or they receive full-size service shoes for a vehicle that only has drum-type parking brakes in the rear.
Prevention: "SERVICE brake shoes for vehicles with rear DRUM brakes" or "PARKING BRAKE shoes for vehicles with rear DISC brakes (drum-in-hat parking brake)." Clearly distinguish the application in the title and description. Include the shoe dimensions (length, width) for buyer verification.
5) Self-adjuster mechanism not functioning after installation
The self-adjuster cable, lever, or spring was not reinstalled correctly, or the adjuster screw was not lubricated, or the star wheel is corroded and will not turn. The shoes do not automatically adjust as they wear, resulting in a progressively longer brake pedal. The buyer attributes this to the new shoes.
Prevention: "Clean and lubricate the adjuster screw assembly with brake-rated anti-seize before installation. Verify the self-adjuster cable routes correctly through the cable guide and over the anchor pin. After installation, verify the self-adjuster operates by pulling the adjuster lever away from the star wheel - it should advance one click and spring back. If the adjuster does not advance, verify cable routing, lever position, and star wheel thread direction."
6) Shoe set for wrong drum brake design
The buyer orders shoes for a duo-servo brake when they have a leading/trailing brake (or vice versa). The shoes may have the same general dimensions but different lining configurations, spring attachment hole positions, or parking brake lever mounting provisions.
Prevention: Brake design type in the fitment details: "Fits duo-servo rear drum brakes" or "Fits leading/trailing rear drum brakes." Shoe dimensions (arc length, width, lining length, web hole positions) in specifications for buyer verification.
7) Drum cannot be reinstalled after shoe installation
The new shoes are too wide (thicker lining than the worn shoes they replaced), and the adjuster has not been backed off to accommodate the increased shoe-to-drum clearance. The drum will not fit over the new shoes. The buyer perceives the shoes as "wrong size" when the actual issue is that the adjuster screw needs to be retracted.
Prevention: "After installing new shoes, retract the adjuster screw to its shortest position to allow the drum to slide over the shoes. After the drum is installed, adjust the shoes outward until light drag is felt, then back off 8 to 10 clicks of the star wheel (or per the vehicle manufacturer's specification). The self-adjuster will fine-tune the clearance during normal driving."
8) Contaminated lining from axle seal leak
This is a tie-back to PartTerminologyID 1632 (Drive Axle Shaft Bearing Assembly). If the rear axle shaft seal is leaking differential oil, the oil will contaminate the drum brake shoe linings. Contaminated linings cannot be cleaned - they must be replaced. The buyer replaces the shoes without replacing the leaking seal, and the new shoes become contaminated within days or weeks. The buyer returns the shoes as "defective" when the actual problem is the axle seal.
Prevention: "If the old shoes show signs of oil or grease contamination, inspect the rear axle shaft seal (see PartTerminologyID 1632) and the wheel cylinder for leaks before installing new shoes. Oil-contaminated linings cannot be cleaned and will fail immediately if the leak source is not repaired first."
9) Shoes installed with contaminated hands or surfaces
Brake lining friction surfaces are extremely sensitive to contamination. Handling the lining surface with greasy hands, spraying brake grease near the lining, or allowing the lining to contact the lubricated backing plate pads will reduce braking effectiveness and cause noise. The buyer perceives poor braking or squeal from the new shoes.
Prevention: "Handle shoes by the steel backing plate only. Do not touch the friction lining surface. Keep brake grease, anti-seize, and lubricants away from all friction surfaces. If contamination occurs, the lining cannot be reliably cleaned - the shoe must be replaced."
Installation Considerations That Affect Returns
The "photograph before disassembly" rule
The single most valuable piece of installation guidance for drum brake shoes: photograph the existing assembly from multiple angles before removing any components. Better yet, disassemble only one side at a time and use the intact side as a reference. The arrangement of springs, cables, levers, and clips in a drum brake assembly is complex enough that even experienced technicians refer to diagrams. A first-time DIY installer working from memory will almost certainly misroute the adjuster cable, reverse a spring, or forget the wave washer under the parking brake lever retaining clip.
Backing plate lubrication
The six raised pads on the backing plate where the shoe webs contact and slide must be cleaned with a wire brush and lubricated with high-temperature brake grease before installing the new shoes. If these pads are not lubricated, the shoes will bind against the backing plate, causing uneven wear, noise, and brake drag. If the wrong lubricant is used (petroleum-based grease instead of brake-specific synthetic grease), the lubricant will break down under heat, contaminate the lining, and cause brake failure.
Wheel cylinder inspection
The wheel cylinder should be inspected for leaks every time the shoes are replaced. If the rubber boots on either end of the wheel cylinder show any wetness, cracking, or deterioration, the wheel cylinder should be replaced. A leaking wheel cylinder will contaminate the new shoe linings with brake fluid, which destroys braking effectiveness immediately. This is the drum brake equivalent of the axle seal leak problem, but with brake fluid instead of gear oil.
Parking brake adjustment
After installing new shoes and drums, the parking brake cable may need to be adjusted. New shoes (thicker lining) change the resting position of the parking brake lever and strut. If the parking brake cable is not adjusted to compensate, the parking brake may not hold the vehicle (cable too loose) or the parking brake shoes may drag against the drum during normal driving (cable too tight).
Bed-in procedure
Like disc brake pads, drum brake shoes require a break-in (bedding) period to transfer friction material to the drum surface and achieve optimal braking performance. The bed-in procedure is similar: 30 moderate stops from 30 mph, allowing cooling between stops, followed by 200 miles of normal driving without heavy braking.
Compatibility Checklist for Buyers
1) Confirm your brake type. Service drum brakes (the drum brake IS the service brake) or parking brake shoes (drum-in-hat parking brake inside a disc brake rotor)? These are different products.
2) Confirm your drum brake design. Duo-servo (primary and secondary shoes are different) or leading/trailing (shoes may be same or different)? This affects which shoes you need and how they are installed.
3) Check what is included. Shoes only, or shoes with hardware? If shoes only, order a complete hardware kit separately. Inspect all existing hardware before starting the job.
4) Identify primary and secondary shoes. The shoe with the shorter lining is the primary shoe (installs in the forward position). The shoe with the longer lining is the secondary shoe (installs in the rearward position). Do not reverse them.
5) Plan for the drum. Inspect the drum for scoring, out-of-round, bell-mouthing, and maximum diameter. Replace or resurface as needed. New shoes on a worn drum will not perform correctly.
6) Plan for the wheel cylinder. Inspect for leaks. Replace if any wetness or deterioration is visible at the boots.
7) Plan for the axle seal. If oil contamination is present on the old shoes, identify and repair the leak source (axle shaft seal or wheel cylinder) before installing new shoes.
8) Have supplies ready. High-temperature brake grease for backing plate pads and adjuster screw threads. Brake cleaner. Brake spring tool set (return spring pliers, hold-down spring tool). Drum brake adjuster tool (spoon). Drum micrometer (to verify drum diameter). Photos or a diagram of the assembly for reference.
9) Full vehicle details. Year, make, model, submodel, trim, engine, brake type (service drum or parking brake drum), drum brake design (duo-servo or leading/trailing).
Catalog Checklist for Attributes
Core taxonomy: Product form: shoe set for one axle (4 shoes), shoe set for one wheel (2 shoes). Position: front (rare, older vehicles), rear, parking brake. Brake design: duo-servo, leading/trailing. Friction formulation: NAO/organic, semi-metallic, ceramic. Lining attachment: bonded, riveted. Separate from drum brake shoe lining (PartTerminologyID 1680 - lining material only), disc brake pad set (PartTerminologyID 1684), brake drum (different PartTerminologyID), brake hardware kit (different PartTerminologyID, though may be included with shoes).
Fitment: Year, make, model, submodel, trim, engine, brake package. Position (front/rear/parking). Brake design type (duo-servo, leading/trailing). Drum diameter. Shoe width. OEM part number cross-reference.
Specifications: Shoe dimensions (arc length, width, lining thickness). Lining length for primary and secondary shoes (if different). Friction formulation. Lining attachment method (bonded/riveted). Backing plate material and gauge.
Included components: Number of shoes (2 or 4). Return springs (yes/no, how many). Hold-down springs with pins and retainers (yes/no). Self-adjuster cable or link (yes/no). Self-adjuster lever and spring (yes/no). Adjuster screw assembly (yes/no). Shoe-to-shoe spring (yes/no). Parking brake hardware (yes/no, which components). Backing plate lubrication pads (yes/no).
Installation notes: Primary shoe (short lining) = forward position. Secondary shoe (long lining) = rearward position. Photograph existing assembly before disassembly. Disassemble one side at a time. Lubricate backing plate pads with brake grease. Clean and lubricate adjuster screw. Verify self-adjuster operation after assembly. Inspect wheel cylinder for leaks. Inspect drum condition. Retract adjuster before installing drum. Bed-in procedure. Parking brake adjustment.
Images: Complete shoe set showing all four shoes with primary/secondary identified. All included hardware laid out. Shoe orientation diagram (primary = forward, secondary = rearward). Backing plate lubrication points.
FAQ
What is the difference between primary and secondary drum brake shoes?
The primary shoe has a shorter friction lining and installs in the forward position on each wheel. The secondary shoe has a longer friction lining and installs in the rearward position. In a duo-servo brake system, the primary shoe self-energizes and transfers braking force through the adjuster linkage to the secondary shoe, which does the majority of the stopping. Reversing the shoes reduces braking effectiveness by up to 40% and causes noise, uneven wear, and possible brake drag.
Can I replace just the shoes without replacing the hardware?
You can, but it is not recommended. Drum brake springs, clips, and cables degrade over time. Stretched return springs cause shoe drag. Worn adjuster cables prevent self-adjustment. Corroded hold-down pins allow shoe movement. Best practice is to replace all hardware with every shoe replacement, the same way best practice is to replace hardware with every disc brake pad replacement (PartTerminologyID 1684).
How long do drum brake shoes last?
Drum brake shoes typically last 30,000 to 60,000 miles on rear service brakes under normal driving conditions. Parking brake shoes in drum-in-hat applications may last the life of the vehicle if the parking brake is used infrequently, or 50,000 to 100,000 miles with regular use. Shoe life depends on driving style, vehicle weight, shoe formulation, drum condition, and whether the self-adjuster is functioning correctly.
Why does my brake pedal go further to the floor after installing new shoes?
The self-adjuster mechanism has not advanced to take up the clearance between the new shoes and the drum. Drive in reverse and apply the brakes firmly several times to activate the self-adjuster. If the pedal does not improve, verify that the adjuster screw is correctly oriented (correct thread direction for the side of the vehicle), the adjuster cable is correctly routed, and the adjuster lever is engaging the star wheel. Also verify manual adjustment through the backing plate access hole using a brake spoon.
What is the difference between service brake shoes and parking brake shoes?
Service brake shoes are the primary braking mechanism on vehicles with drum brakes - they slow and stop the vehicle during normal driving. Parking brake shoes (drum-in-hat) are small shoes inside the center of a disc brake rotor that hold the vehicle stationary when parked. They are not used for service braking. These are different products with different dimensions, different drum diameters, and different part numbers. Verify which type your vehicle needs before ordering.
Final Take for Aftermarket Teams
Drum Brake Shoe (PartTerminologyID 1688) is the most installation-sensitive product in the brake category. The return rate is driven not by product quality but by installation complexity - primarily by primary/secondary shoe reversal, missing hardware, incorrect adjuster orientation, and the confusion between service shoes and parking brake shoes.
The catalog teams that reduce these returns do five things consistently. First, they identify the primary and secondary shoes in the listing (shorter lining = primary = forward, longer lining = secondary = rearward) and state this in both the description and the images. Second, they itemize every included hardware component so the buyer knows before ordering whether they need a separate hardware kit. Third, they clearly distinguish service brake shoes from parking brake shoes in the title, not just the fitment details, because the buyer searching "rear brake shoes" on a disc-brake vehicle needs to immediately understand they need the parking brake version. Fourth, they cross-reference the hardware kit, the wheel cylinder, the drum, and the axle shaft seal (PartTerminologyID 1632) as related components, because drum brake shoe replacement done correctly requires inspection and potential replacement of all of these parts. Fifth, they include a note about the adjuster screw thread direction (left-hand versus right-hand, side-specific), because this is a safety-critical fitment variable that is invisible until the brakes begin to self-loosen instead of self-tighten.
The drum brake shoe may be a declining category in new vehicle applications, but it is not a declining category in service volume, and it is certainly not a declining category in return rate. Catalog accuracy on this product prevents returns, prevents safety hazards, and builds buyer confidence in a product category that intimidates even experienced DIY installers.