Drive Axle Shaft Bearing Collar (PartTerminologyID 1648): The Press-Fit Ring That Holds the Bearing on the Shaft
Written by Arthur Simitian | PartsAdvisory
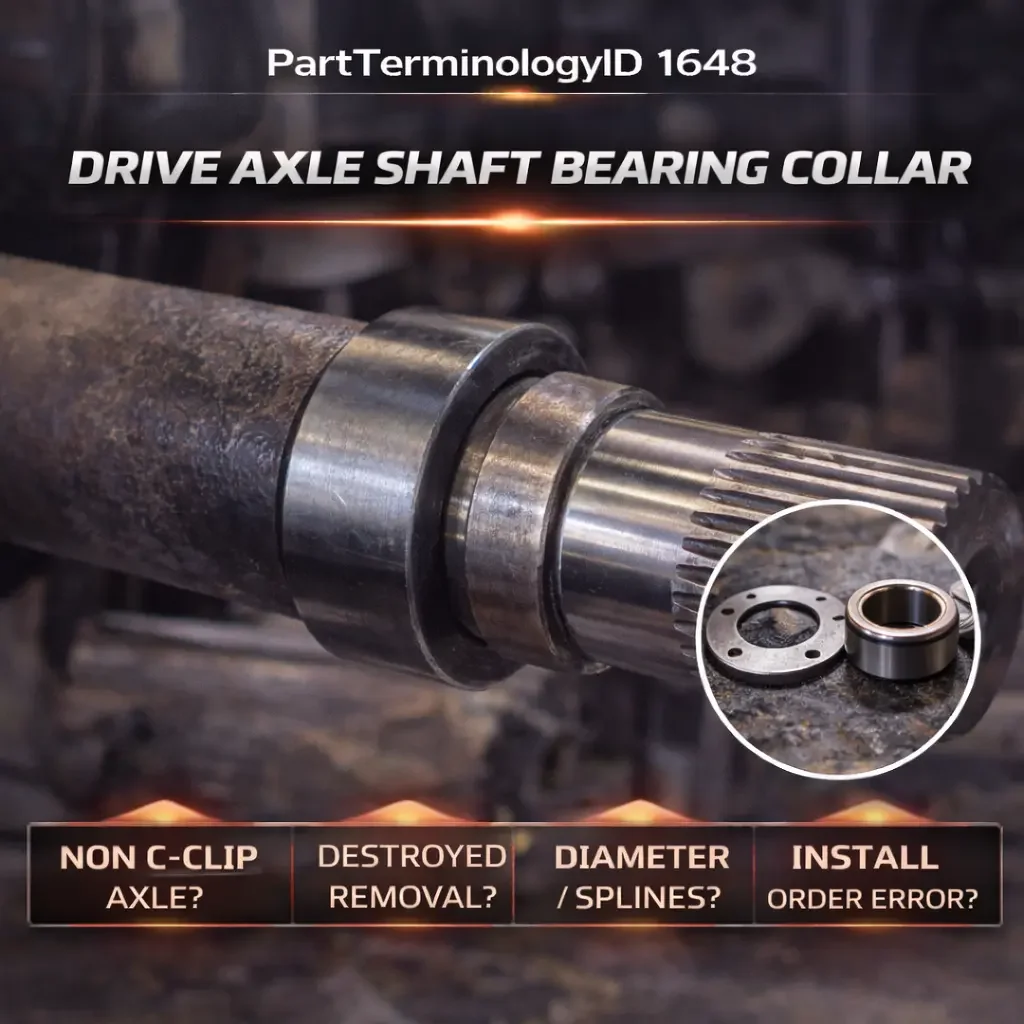
The drive axle shaft bearing collar is the hardened steel ring that is pressed onto the axle shaft to retain the axle bearing in position. It sits immediately inboard of the bearing on non-C-clip (bolt-in) semi-floating rear axles and prevents the bearing from sliding along the shaft under load. Without it, the bearing walks off the shaft, the axle pulls out of the housing, and the wheel leaves the vehicle.
This is a small, inexpensive part - typically $5 to $20 retail - that causes outsized problems in the aftermarket because of the extreme press fit required to install it and the destructive process required to remove it. The collar has a nominal interference fit of 0.003 to 0.005 inches on the shaft, meaning its inner diameter is intentionally smaller than the shaft diameter. It must be pressed on with 10 to 20 tons of force, and it cannot be pressed off - it must be cut off with a grinding wheel or cut-off tool and cracked with a chisel. This one-way installation means the collar is destroyed during every bearing service, and a new collar is required every time the bearing is replaced.
The collar is specific to non-C-clip axle designs. On C-clip axles (common on GM 10-bolt, some Ford, and some Chrysler), the axle shaft is retained by a C-clip inside the differential, and no bearing collar is used. The bearing simply presses into the axle housing bore. On non-C-clip axles (Ford 9-inch, Ford 8.8, many Dana axles, some Chrysler), the bearing presses onto the axle shaft, the collar presses onto the shaft behind the bearing to lock it in place, and a retainer plate bolts to the axle housing flange to hold the entire assembly in the housing.
This post covers the collar itself, the installation challenges that generate returns, and the catalog details that prevent the buyer from getting stuck mid-job with the wrong part.
What Drive Axle Shaft Bearing Collar Means in the Aftermarket
The bearing collar (also called a bearing retainer ring, lock ring, lock collar, or press ring depending on the manufacturer and catalog system) is a simple hardened steel ring with a precision inner bore. It has no moving parts, no seals, no threads, and no adjustment mechanism. Its only function is to provide a press-fit shoulder behind the bearing that prevents the bearing from moving along the shaft.
In the aftermarket, the collar is sold in three configurations:
Collar only. The collar as a standalone component. The buyer already has the bearing and seal and needs only the collar because the old one was destroyed during removal. This is the most common configuration for repeat orders.
Bearing and collar set. The axle bearing and collar packaged together. This is the most practical configuration because both are replaced together during every bearing service. The collar cannot be reused, and installing a new bearing without a new collar is not possible.
Complete bearing kit. The bearing, collar, seal, and sometimes the retainer plate gasket packaged together. This is the full service kit for a non-C-clip axle bearing replacement. Examples include Timken SET series kits and equivalent kits from BCA/National, Koyo, and other manufacturers.
The collar is NOT the retainer plate (the flat plate that bolts to the axle housing flange to hold the bearing and shaft in the housing). The retainer plate is a separate component and a separate PartTerminologyID. Confusing the collar with the retainer plate is a common catalog error.
How the Bearing Collar Works in the Axle Assembly
The installation sequence on a non-C-clip axle is specific and order-dependent. Getting the order wrong means cutting everything off and starting over:
Step 1: Slide the retainer plate (backing plate gasket, if applicable) and retainer plate onto the axle shaft from the flange end.
Step 2: Press the bearing onto the axle shaft. The bearing inner race has an interference fit with the shaft (typically 0.001 inches). A hydraulic press or bearing driver is required.
Step 3: Press the collar onto the axle shaft immediately behind the bearing. The collar has a tighter interference fit than the bearing (typically 0.003 to 0.005 inches). Significant force is required.
Step 4: Insert the axle shaft assembly (with retainer plate, bearing, and collar) into the axle housing from the wheel end. The bearing outer race seats in the axle housing bore. The retainer plate aligns with the bolt holes on the axle housing flange and is bolted in place.
The collar's press fit creates a permanent mechanical lock. Once pressed on, the collar cannot be removed without destruction. The collar and bearing together create a captive assembly on the shaft that can only move as a unit.
The critical installation error - and the one that generates the most forum posts, profanity, and wasted parts - is forgetting to install the retainer plate before pressing the bearing and collar. Once the bearing and collar are pressed on, the retainer plate cannot be slipped over them (its center hole is smaller than the bearing and collar outer diameters). The only solution is to cut off the collar, press off the bearing, slide the retainer plate on, and start over with new parts. This error destroys the collar, often damages the bearing, and adds hours to the job.
Why Drive Axle Shaft Bearing Collars Are Replaced
Destroyed during bearing service
This is the primary reason for replacement. Every time the axle bearing is replaced, the old collar must be cut off and a new one pressed on. The collar is a one-time-use component by design.
Loose or failed press fit
In rare cases, the collar loses its press fit on the shaft due to a shaft that is undersized (from wear, corrosion, or manufacturing variation), a collar that is oversized (from manufacturing variation), or a collar that was not fully seated during installation. A loose collar allows the bearing to migrate along the shaft, which can result in the axle pulling out of the housing. This is a catastrophic failure.
Incorrect collar installed
A collar with the wrong inner diameter will either not fit the shaft at all (too small to press on even with maximum force) or will not achieve sufficient press fit (too large, goes on easily but does not hold). The inner diameter must match the shaft diameter within the specified interference tolerance.
Installation Challenges That Drive Returns
The press fit is extreme
The 0.003 to 0.005 inch interference fit on the collar requires 10 to 20 tons of force to install. A standard 12-ton shop press may not be sufficient for some applications, particularly with harder collars or slightly oversized shafts. This is a documented issue on aftermarket alloy axle shafts, which may have slightly different dimensional tolerances than OE shafts.
The heat-and-freeze technique is widely used: heat the collar to 400-500 degrees Fahrenheit (in an oven, not with a torch, to ensure even expansion) to expand it, and optionally freeze the axle shaft to contract it. This reduces the effective interference and allows the collar to slide on with less force. Once the temperatures equalize, the interference fit is established.
Buyers who do not have access to a hydraulic press, or whose press is not strong enough, will return the collar as "does not fit" when the actual problem is insufficient pressing force.
The collar cocks sideways during pressing
If the collar is not perfectly aligned with the shaft during pressing, it tilts (cocks) and digs into the shaft surface, creating steel slivers that wedge between the collar and shaft. Once cocked, the collar cannot be straightened and must be cut off. This wastes the collar and may damage the shaft. Proper alignment requires a pressing tube or sleeve that contacts the collar evenly around its entire circumference. Using a drift, punch, or socket that contacts the collar at a single point will cause it to cock.
Aftermarket alloy shafts with different tolerances
Aftermarket performance axle shafts (from Yukon, Superior Axle, Moser, Currie, and others) may have slightly different shaft diameters or surface finishes compared to OE shafts. A collar that fits an OE shaft may be too tight or too loose on an aftermarket shaft. This creates a fitment variable that is not captured in standard year/make/model catalog lookups.
Forgetting the retainer plate
As detailed above, pressing the bearing and collar before installing the retainer plate requires cutting everything off and starting over. This is not a product defect, but it generates negative reviews and sometimes returns of "defective" parts that were actually installed in the wrong sequence.
Fitment Variables
Axle shaft diameter
The collar inner diameter must match the shaft diameter. Different axle types use different shaft diameters. Common shaft diameters include 1.372 inches (Dana 44), 1.531 inches (Ford 9-inch with 28-spline shafts), 1.563 inches (Ford 9-inch with 31-spline shafts), and others. The shaft diameter is determined by the axle type and spline count, not by the vehicle year/make/model alone.
Collar outer diameter
The collar outer diameter must clear the bearing inner race and the axle housing bore. If the collar OD is too large, it may interfere with the housing or the bearing. Standard collar ODs range from approximately 1.875 to 2.250 inches depending on the application.
Collar thickness (width)
The collar width must match the shaft and bearing configuration. A collar that is too thin may not provide sufficient bearing retention surface. A collar that is too thick may interfere with the retainer plate or housing.
Material hardness
The collar must be hard enough to resist deformation under the bearing's axial loads but not so hard that it cracks during pressing. OE and quality aftermarket collars are typically made from medium-carbon steel with a case-hardened surface.
Top Return Causes
1) "Does not fit" - insufficient press force
The buyer cannot press the collar onto the shaft with the available equipment and returns it as wrong part or defective.
Prevention: "This collar requires a hydraulic press (minimum 15-20 tons recommended) for installation. The interference fit is 0.003 to 0.005 inches. Heating the collar to 400-500F before pressing significantly reduces the required force."
2) Wrong inner diameter for the axle shaft
The buyer orders a collar for the wrong axle type or wrong spline count. A 28-spline Ford 9-inch shaft has a different diameter than a 31-spline shaft, and they require different collars.
Prevention: Shaft diameter and spline count in the fitment details. Axle type in the listing title. "Fits Ford 9-inch rear axle with 31-spline shafts (1.563 inch shaft diameter)."
3) Already included in the bearing kit
The buyer orders a collar separately, then discovers that the bearing kit they already purchased includes a collar. They return the standalone collar.
Prevention: Cross-reference with the common bearing kit part numbers for the same application. "This collar is included in bearing kit [part number]. If you have purchased the complete bearing kit, a separate collar is not needed."
4) Collar damaged during pressing (cocked sideways)
The buyer pressed the collar crooked, damaging it and possibly the shaft. They return the collar as defective.
Prevention: "Press the collar using a tube or sleeve that contacts the collar evenly around its full circumference. Do not use a single-point tool (drift, punch, or socket). Ensure the collar is perfectly square to the shaft before applying press force. A cocked collar will dig into the shaft and must be discarded."
Compatibility Checklist for Buyers
1) Confirm your axle type and shaft spline count. The collar inner diameter is determined by the axle shaft diameter, which is determined by the axle type and spline count.
2) Confirm non-C-clip axle design. C-clip axles do not use a bearing collar. If your axle uses C-clips (check by removing the differential cover and looking for C-clips on the axle shaft ends inside the differential), you do not need this part.
3) Check whether your bearing kit includes the collar. Many complete bearing kits include the collar. Do not order separately if already included.
4) Have the right tools. Hydraulic press (15-20 ton minimum), oven or heat source for heating the collar, pressing tube or sleeve for even force application, cut-off wheel and chisel for old collar removal.
5) Remember the retainer plate. Install the retainer plate onto the axle shaft before pressing the bearing and collar. This step cannot be reversed without destroying the collar and bearing.
Catalog Checklist for Attributes
Core taxonomy: Product form: collar only, collar included in bearing kit, collar included in complete bearing and seal kit. Also known as: bearing retainer ring, lock ring, lock collar, press ring. Separate from retainer plate (the bolt-on plate that holds the assembly in the housing).
Fitment: Year, make, model, submodel, trim, drivetrain. Axle type (Ford 9-inch, Ford 8.8, Dana 35, Dana 44, Dana 60, etc.). Shaft spline count. Shaft diameter.
Specifications: Inner diameter (bore). Outer diameter. Width (thickness). Material.
Included components: Collar only, or included with bearing/seal kit (specify kit contents).
Installation notes: Press fit interference specification. Recommended pressing method. Heat treatment recommendation for easier installation. Old collar removal method (cut-off wheel + chisel). Retainer plate installation order warning.
Images: Collar alone, collar in context on an axle shaft (showing position relative to bearing and retainer plate), pressing orientation.
FAQ
Is the bearing collar the same as the retainer plate?
No. The collar is the press-fit ring on the axle shaft that holds the bearing in position. The retainer plate is the flat plate that bolts to the axle housing flange and holds the entire axle shaft/bearing/collar assembly inside the housing. They are different parts with different functions and different PartTerminologyIDs.
Can I reuse the old collar?
No. The collar must be cut off the shaft during removal because the press fit is permanent. Cutting destroys the collar. A new collar is required every time the bearing is serviced.
Why can't I press the collar on with my 12-ton press?
The interference fit on some collars requires more than 12 tons of force, especially if the shaft is at the high end of the diameter tolerance or the collar is at the low end. Heating the collar to 400-500F in an oven before pressing will expand it enough to significantly reduce the required force. Some technicians also freeze the shaft to contract it, further reducing the effective interference.
I pressed the bearing and collar on before installing the retainer plate. What do I do?
Cut the collar off with a cut-off wheel (cut approximately 3/4 of the way through, then crack with a chisel to avoid cutting into the shaft). Press the bearing off. Slide the retainer plate onto the shaft. Press a new bearing on, then press a new collar on. The old collar and potentially the old bearing are destroyed and must be replaced.
Final Take for Aftermarket Teams
Drive Axle Shaft Bearing Collar (PartTerminologyID 1648) is a $5 to $20 part that cannot be reused, cannot be installed without specialized equipment, and cannot be removed without being destroyed. It is the definition of a consumable drivetrain component. Every axle bearing replacement on a non-C-clip axle requires a new collar, making it a guaranteed companion sale to the bearing and seal kit. The catalog teams that handle this part well do three things: they specify the axle type and shaft diameter (not just year/make/model), they cross-reference the collar against the common bearing kits to prevent duplicate purchases, and they include the installation sequence warning about the retainer plate. That last point is not just good customer service - it prevents the buyer from destroying the collar they just purchased and ordering a second one, which is good for the buyer but bad for the seller's return rate and the buyer's opinion of the product.