Headlight Adjusting Screw (PartTerminologyID 1388): The Part That Costs a Dollar and Holds Up a Thousand-Dollar Repair
Written by Arthur Simitian | PartsAdvisory
The headlight adjusting screw is one of the smallest and cheapest parts in the collision repair ecosystem. It is also one of the most frustrating to deal with when it breaks, because when it does, the headlight cannot be aimed.
Headlight aiming is not optional. Every state requires headlights to be aimed within specific vertical and horizontal tolerances. A headlight that is aimed too high blinds oncoming drivers. A headlight that is aimed too low does not illuminate the road adequately. A headlight that is aimed too far left or right creates uneven coverage. After any collision repair that involves the headlight, the bumper cover, the fender, or the front structural components, the headlights must be re-aimed. The adjusting screws are how that aiming happens.
The problem is that adjusting screws are made of plastic. They sit in a hot engine bay environment for years, become brittle from heat cycling and UV exposure, and snap the moment a technician tries to turn them during a headlight aim. When they snap, the headlight cannot be adjusted. The repair stops. The technician needs a replacement screw that is specific to the headlight assembly, and nobody stocks it because it is a two-dollar part that nobody thinks about until it breaks.
This post is built for aftermarket catalog teams, marketplace sellers, and buyers who want fewer mistakes and fewer returns.
Status in New Databases
Status in New Databases
Current: PIES 7.2 + PCdb Future: PIES 8.0 + PCdb 2.0 Status: No change
What Headlight Adjusting Screw Means in the Aftermarket
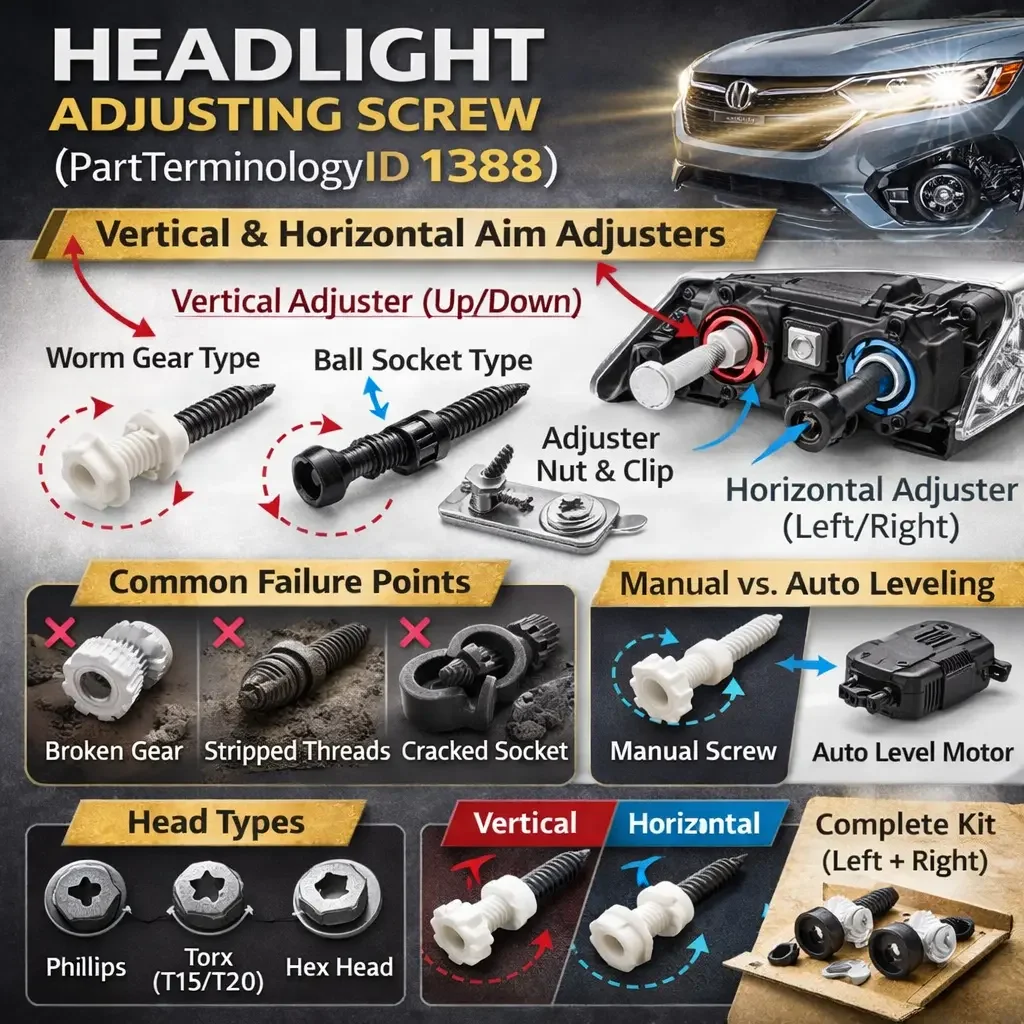
Headlight Adjusting Screw refers to the threaded fastener (screw, bolt, or gear mechanism) that controls the vertical and/or horizontal aim of the headlight assembly. Turning the screw moves the headlight reflector or the entire headlight housing on a pivot, changing the beam direction.
In catalog reality, this covers:
Adjusting screw (worm gear type). The most common type on modern vehicles. A plastic screw with a worm gear on one end that engages a gear track on the headlight housing. Turning the screw with a Phillips, Torx, or hex driver rotates the gear, which tilts the headlight up/down or left/right. This is the part that breaks most often because the plastic gear teeth strip or the screw shaft snaps.
Adjusting screw with ball socket. A screw that terminates in a ball-and-socket joint. The ball end seats in a socket on the headlight housing. Turning the screw pushes or pulls the ball, tilting the headlight. The socket can crack from age, releasing the ball and causing the headlight to flop loose.
Adjusting screw and nut assembly. Some vehicles use a metal screw with a captive nut or clip that attaches to the headlight housing or the radiator support. The screw threads through the nut, and turning the screw changes the headlight position.
Adjuster gear / pivot gear. On some vehicles, the adjusting mechanism is a separate plastic gear that the screw drives. This gear is the failure point rather than the screw itself. It may be sold as a separate part or as a kit with the screw.
Headlight adjuster motor (automatic leveling). On vehicles with automatic headlight leveling (common on HID and LED headlights, and required by regulation in many markets for projector headlights), the vertical aim is controlled by an electric motor rather than a manual screw. This motor is a different PartTerminologyID and a significantly more expensive part. The manual adjusting screw may still be present for horizontal aim even on vehicles with automatic vertical leveling.
What this part does NOT cover
Headlight assembly (the complete headlight unit). Different PartTerminologyID.
Headlight bulb. Different PartTerminologyID.
Headlight leveling motor (the electric motor for automatic leveling systems). Different PartTerminologyID.
Headlight mounting bracket or retainer. Different PartTerminologyID.
Why a Two-Dollar Part Creates Real Problems
Heat and UV degradation
Headlight adjusting screws are predominantly made of plastic (nylon, polyoxymethylene/POM, or other engineering plastics). These materials are chosen for their low cost, light weight, and self-lubricating properties. But they degrade in the engine bay environment. The combination of engine heat, ambient temperature cycling (especially freeze/thaw in northern climates), and UV exposure through the headlight lens and engine bay gaps makes the plastic brittle over time.
On a 5-year-old vehicle, the adjusting screw may still turn. On a 10-year-old vehicle, it often snaps the first time someone tries to adjust it. Collision technicians know this and approach headlight aiming on older vehicles with caution, but even careful technique cannot save a screw that has become so brittle it crumbles under normal turning force.
Vehicle-specific geometry
Every headlight assembly has a different adjusting screw configuration. The screw length, thread pitch, gear tooth count, gear diameter, ball socket diameter, and head type (Phillips, Torx T15, Torx T20, hex, or proprietary) are all specific to the headlight assembly design. A screw from a Honda Civic will not fit a Toyota Camry. A screw from a 2015 F-150 will not fit a 2018 F-150 if the headlight assembly changed.
This vehicle-specificity is the core catalog challenge. There are hundreds of unique adjusting screw configurations across the vehicle population, each one a low-cost, low-volume part that is difficult to identify without the headlight assembly in hand.
Two screws per headlight, different functions
Most headlight assemblies have two adjusting screws: one for vertical aim (up/down) and one for horizontal aim (left/right). On many vehicles, the vertical and horizontal screws are different lengths, different thread pitches, or different gear configurations. They are not interchangeable within the same headlight. The listing must specify: vertical adjuster, horizontal adjuster, or kit (both).
Dealer-only parts trap
Many adjusting screws are only available through the OEM dealer parts counter because aftermarket suppliers do not produce them in sufficient volume to justify tooling. This creates a situation where a $2 screw must be ordered from the dealer with a 2 to 5 day lead time, holding up a collision repair that is otherwise complete. The shop may have a $3,000 repair ready for delivery, waiting on a $2 screw from the dealer.
This is a real opportunity for aftermarket catalog teams that can identify the highest-volume adjusting screw applications and stock them for same-day or next-day availability. The margin on the part is small, but the value to the collision shop is enormous.
Top Return Causes
1) Wrong headlight assembly application
Adjusting screw does not fit the buyer's headlight because the headlight changed between model years or between halogen and LED/HID versions.
Prevention: Fitment must reference the specific headlight assembly, not just the vehicle. "For vehicles with halogen headlights" versus "For vehicles with LED projector headlights." Cross-reference to OEM headlight assembly part number and adjusting screw part number.
2) Vertical versus horizontal screw mismatch
Buyer orders one screw and receives the wrong axis adjuster.
Prevention: Specify function in the title: "Headlight Vertical Adjusting Screw" or "Headlight Horizontal Adjusting Screw" or "Headlight Adjusting Screw Kit (Vertical and Horizontal)."
3) Wrong head type
Screw has a Phillips head but the vehicle's adjusting access port requires a Torx driver, or vice versa.
Prevention: Specify head type: Phillips, Torx T15, Torx T20, hex 4mm, or proprietary. Include a photo of the screw head.
4) Wrong gear tooth count or ball socket diameter
The screw looks similar but the gear teeth do not engage the headlight housing gear track, or the ball does not seat in the socket.
Prevention: OEM part number cross-reference. Gear tooth count and ball diameter as specifications where applicable.
5) Automatic leveling vehicle, manual screw not applicable
Buyer orders a manual vertical adjusting screw for a vehicle with automatic headlight leveling that uses an electric motor for vertical aim.
Prevention: "For vehicles with manual headlight aiming" in the fitment notes. "Not for vehicles with automatic headlight leveling (motor-driven vertical aim)."
Compatibility Checklist for Buyers
1) Identify which screw broke. Vertical (up/down) or horizontal (left/right). Look at the headlight assembly to determine which adjuster failed.
2) Confirm your headlight type. Halogen, HID/Xenon, or LED. The headlight assembly design (and therefore the adjusting screw) may differ between lighting types on the same vehicle.
3) Confirm manual versus automatic leveling. If your headlights level automatically (common on HID and LED), the vertical aim may be motor-controlled. The manual screw may only handle horizontal aim.
4) Note the screw head type. Phillips, Torx, or hex. Match to the replacement.
5) Cross-reference to the OEM part number. This is the most reliable way to ensure the correct screw. The dealer parts counter can look it up by VIN.
6) Confirm full vehicle details. Year, make, model, submodel, headlight type (halogen vs. LED vs. HID).
Catalog Checklist for Attributes
Core taxonomy: Product form (single adjusting screw, adjusting screw with gear, adjusting screw with ball socket, screw and nut assembly, vertical and horizontal kit). Separate from Headlight Assembly, Headlight Leveling Motor, and Headlight Mounting Bracket.
Fitment: Year, make, model, submodel. Headlight type (halogen, HID, LED). Manual versus automatic leveling. Position: Left headlight, Right headlight, or Universal (fits both sides). Function: Vertical, Horizontal, or Kit. OEM part number cross-reference (critical for this category).
Physical specs: Screw length, thread pitch, head type (Phillips, Torx T15, Torx T20, hex), gear tooth count (if applicable), ball diameter (if applicable), material (nylon, POM, metal).
Package contents: Number of screws, any included gears or sockets, mounting clips.
Images: Full screw with gear or ball end visible, head close-up showing driver type, side view showing length and thread, and a reference image showing the screw location on the headlight assembly if available.
FAQ
Why do headlight adjusting screws break so easily?
They are made of plastic that degrades from heat and UV exposure over time. After several years in the engine bay, the plastic becomes brittle and can snap under normal turning force during headlight aiming.
Can I use a metal screw as a replacement?
Some aftermarket kits offer metal replacement screws for specific applications. These are more durable but must still match the gear engagement or ball socket dimensions of the original plastic screw. A metal screw that does not match the housing geometry will not adjust properly.
My headlight is loose and flopping around. Is it the adjusting screw?
Likely yes. If the adjusting screw or its ball socket breaks, the headlight loses its fixed position on that axis and can move freely. Check both the vertical and horizontal adjusting screws and their sockets for cracks or breakage.
How do I aim my headlights after replacing the screw?
Park the vehicle on a flat surface 25 feet from a wall. Mark the headlight center height on the wall. Turn on the low beams. Adjust the vertical screw until the top of the beam pattern is at or slightly below the marked height. Adjust the horizontal screw until the beam is centered on the vehicle's forward line. Many collision shops use headlight aiming machines for precision alignment.
Final Take for Aftermarket Teams
Headlight Adjusting Screw (PartTerminologyID 1388) is the definition of a small part with outsized consequences. It costs almost nothing, it breaks constantly on older vehicles, it is completely vehicle-specific, and when it is unavailable, it holds up expensive collision repairs. The catalog challenge is identifying the correct screw for the correct headlight assembly, specifying vertical versus horizontal, specifying head type and gear/socket dimensions, and cross-referencing to the OEM part number. The business opportunity is stocking the highest-volume applications for immediate availability when the collision shop needs one today, not in three days from the dealer. The part is worth $2. The value of having it in stock when nobody else does is worth far more.