Rocker Panel (PartTerminologyID 1092): The Complete Map of Types, Repair Methods, and Listing Traps
Rocker panels are not glamorous. They are not a “fun upgrade.” They are a reality check.
When a rocker panel fails, it is not cosmetic anymore. It is structure, safety, jacking points, door alignment, and road salt damage that has been quietly running up a tab for years.
It is also one of the most return-heavy body categories online because the word “rocker” gets used for too many different things:
a welded steel rocker panel
a slip-on outer skin
an inner rocker reinforcement
a rocker molding cover
a side skirt
a rocker guard
Buyers search “rocker panel” and sellers ship “rocker molding.” Or the buyer expects a full structural piece and receives a small patch panel.
This post is the PartsAdvisory field guide for Rocker Panel in PCdb PartTerminologyID 1092.
Status in New Databases (ID 1092)
Feature: Current (PIES 7.2 / PCdb) -> Future (PIES 8.0 / PCdb 2.0)
PartTerminologyID: 1092 -> 1092 (No change)
Terminology Name: Rocker Panel -> Rocker Panel
What people call this part
If your listing only uses “rocker panel,” you miss intent and invite confusion.
Common names:
rocker panel
rocker
rocker repair panel
rocker skin
outer rocker
inner rocker
rocker reinforcement
pinch weld rocker
rocker sill panel
side sill
cab corner and rocker (bundled kits)
dogleg (rear lower door opening area, often sold alongside rocker pieces)
Also commonly confused with:
rocker panel molding
rocker trim
side skirt
rocker guard
running board mount covers
The fastest way to reduce returns is to say what it is not.
What a rocker panel is, in plain terms
The rocker panel is the lower body structure that runs under the doors, between the front and rear wheel openings.
On most vehicles, the rocker area includes multiple layers:
outer rocker panel (the exterior visible skin)
inner rocker panel (the structural inner piece)
reinforcements (often around jacking points and seat belt anchors)
pinch weld seam (the folded seam along the bottom edge)
Rust loves this zone because it is a trap for moisture, salt, and debris, and it is constantly blasted by front tire spray.
Why buyers buy rocker panels
Rocker panels get purchased for two main reasons:
1) Rust repair
This is the big one. Especially in salt states.
Common triggers:
visible bubbling paint
holes along the pinch weld
soft spots near jacking points
failed inspections
doors that start to sag or misalign
2) Collision or impact damage
Side impacts, curb hits, off-road damage, or improper jacking can crush rocker areas. Even “minor” dents can ripple into door fitment problems.
The rocker panel family tree
If you teach this map, you cut returns immediately.
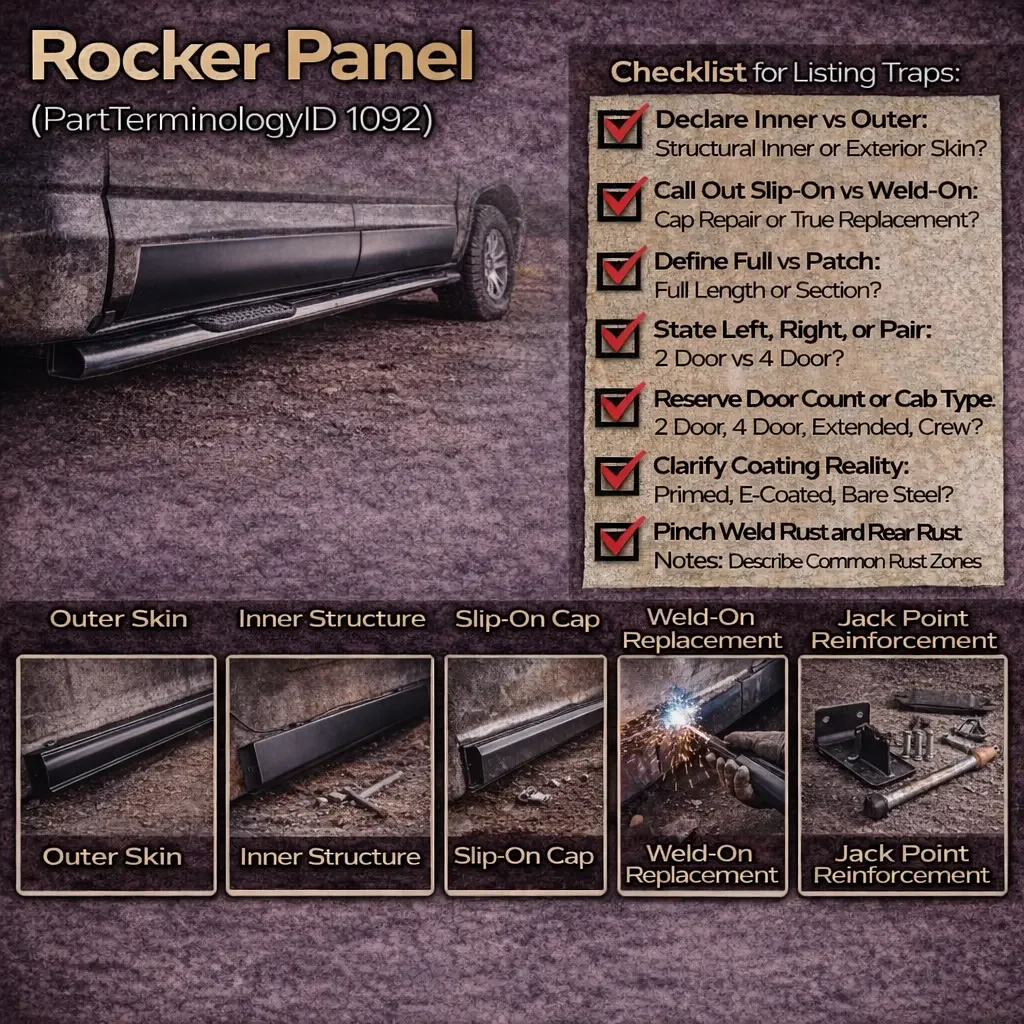
1) Outer rocker panel
This is the exterior skin. It is what you see when you look at the vehicle from the side.
Variants:
full length outer rocker
partial outer rocker patch
front section patch
rear section patch
Listing trap:
Buyers expect a full length panel and receive a patch.
2) Inner rocker panel
This is the structural inner layer behind the outer skin.
Variants:
full length inner rocker
inner reinforcement sections
jacking point reinforcements
Listing trap:
Inner and outer are not interchangeable. If your listing does not say inner or outer, you are gambling.
3) Slip-on rocker panel (cap style)
This is an outer skin designed to fit over the existing rocker.
Pros:
easier for DIY
less cutting
Cons:
can trap rust underneath if the underlying rocker is not properly repaired
fit and seam lines can look non-OEM
Listing trap:
Buyers think they are getting an OEM style replacement panel and receive a slip-on cap.
4) Weld-on rocker panel (true replacement)
This is designed to be cut in and welded in.
Pros:
best long-term repair when done correctly
can restore structure
Cons:
higher skill requirement
more labor
Listing trap:
If a buyer is DIY without welding, they buy a weld-on panel and panic. That is not the product’s fault, but it becomes your return.
5) Rocker panel assembly kits
Some sellers bundle:
rocker panel plus cab corners
rocker plus dogleg sections
left and right pair
Listing trap:
Customers assume both sides are included. Always declare left only, right only, or pair.
Materials and coatings
Most rocker repair panels are steel. Some vehicles use aluminum in certain body structures, but repair panels are still commonly steel unless explicitly marketed otherwise.
Key details buyers care about:
galvanized steel or corrosion protected steel
e-coated panels
primed panels
bare steel (requires immediate prep)
Listing trap:
“Primed” does not mean paint-ready. Many primers are shipping primers and still require sanding, cleaning, and proper primer before topcoat.
Rust zones and what it tells you about which panel you need
Rocker rust usually starts in predictable places:
Pinch weld seam
If the seam is flaking and swollen, the inner structure is often compromised too. That usually points to more than an outer skin patch.
Rear of the rocker near the wheel opening
This area collects debris behind liners. It is common to need a rear section patch or a dogleg plus rocker combo.
Jacking points
If the jacking point area is soft or crushed, reinforcements may be needed. This is where structural repairs matter.
Buyer education that reduces returns:
A rocker panel is not always a single panel problem. Sometimes it is multiple layers.
Weld-on vs slip-on: the real tradeoffs
Weld-on
Best when:
rust is severe
structure needs restoration
you want OEM-like seams and strength
Costs:
more labor
welding, grinding, sealing, paint work
Slip-on
Best when:
the inner structure is still solid
you want a faster cosmetic repair
the buyer is DIY and wants to avoid major cutting
Risk:
if the underlying rust is not removed and sealed, it will come back
If you sell slip-on caps, your blog should say this clearly: slip-on is not a cure for rotten structure.
Fitment reality: why rocker panels are not generic
Rocker panels vary by:
number of doors (2-door and 4-door differ)
wheelbase and body length
cab type on trucks (regular, extended, crew)
bed length relevance on some truck bodies
trim packages with side skirts or molding
rocker shape changes across facelifts within the same generation
This is why the listing needs more than “fits 2014-2018.” It needs body configuration.
Installation considerations buyers should know
Even if you are not selling labor, the blog should teach basic truth. It builds trust.
Typical repair steps:
Inspect and identify inner vs outer damage
Cut out rust back to solid metal
Test fit panel and mark cut lines
Weld or attach based on panel type
Grind and smooth welds
Seam seal all joints
Prime properly
Paint and undercoat where needed
Ensure drain paths are not blocked
Two points that matter for returns:
buyers expect “bolt-on” because they live in a bolt-on world
rocker panels are body repair parts, not bolt-on accessories
Make that explicit.
Box contents and what customers assume
Rocker panel listings fail when the photo implies more than the box includes.
Common assumptions:
both sides included
inner and outer included
hardware included (usually not)
moldings included (usually not)
pre-painted finish (rare)
Best practice:
State exactly what is included:
left only, right only, or pair
inner or outer
full length or section
weld-on or slip-on
The listing traps that cause the most returns
Trap 1: Rocker panel vs rocker molding
A molding is trim. A rocker panel is steel structure. Buyers confuse them constantly.
Fix:
Call it “repair panel” if it is a repair panel. Add “not a trim molding” line in bullets.
Trap 2: Inner vs outer not declared
Fix:
Put inner or outer in the first line.
Trap 3: Slip-on vs weld-on not declared
Fix:
Declare the installation type.
Trap 4: Patch panel sold like a full length panel
Fix:
Use actual dimensions or “front section” and “rear section” language.
Trap 5: Door count and cab type ignored
Fix:
Declare 2-door vs 4-door, or regular vs crew cab.
Trap 6: Buyers expect a complete assembly
Some vehicles have rocker reinforcements and multiple layers. A single panel does not solve everything.
Fix:
Set expectations. If it is outer skin only, say it.
Trap 7: Coating misunderstandings
Fix:
Primed, e-coated, or bare steel should be stated clearly with prep expectations.
Catalog checklist for PartTerminologyID 1092
If you want clean listings and fewer returns, capture these attributes:
Side: left, right, pair
Layer: outer rocker, inner rocker, reinforcement
Coverage: full length, front section, rear section, dogleg included or not
Install type: weld-on replacement, slip-on cap
Material: steel, galvanized steel, aluminum if applicable
Coating: e-coated, primed, bare steel
Door count or cab type: 2-door, 4-door, regular cab, crew cab
Notes: fits with side skirts or requires removal
Notes: jacking point reinforcement included yes or no
This is the minimum structure required for marketplace clarity.
Quick FAQ
Is a rocker panel the same as a side skirt?
No. Side skirts are usually cosmetic trim. Rocker panels are body structure.
Do I need inner and outer panels?
If rust is only cosmetic, outer may be enough. If the pinch weld and jacking points are compromised, inner structure often needs repair too.
Slip-on or weld-on, which is better?
Weld-on is the correct structural repair. Slip-on can be fine for cosmetic fixes if the underlying metal is solid and sealed properly.
Are rocker panels bolt-on?
Usually no. They are body repair parts.
Will a primed panel match my paint?
No. Primed means it is prepped for further paint work, not finished.